| Click here to download a PDF of this article. |
Using a standardized protocol allows clinicians to approach each refraction in a logical and sequential manner, eliminating simple mistakes that lead to clinician and patient frustration, and longer chair time. The protocol below was developed for the University of Iowa as its standard refraction technique and we have had great success with it in minimizing mistakes and delays. We want to share it so that our fellow optometrists can be more efficient in their refractions and enjoy the positive impact it will have in the office.
We encourage you to download, print and place this protocol in your office for easy reference.
Taking a Baseline
Prior to starting your refraction, baseline visual acuities (OD, OS and OU) must be determined. For individuals with near vision complaints, and all presbyopes, near acuity should also be documented using M-notation, and testing distance should be documented if it is different than 16in, or 40cm.
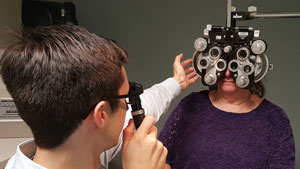 | |
| Start off right with an objective determination of refractive error by retinoscopy. Photo: Marc B. Taub, OD. |
Accurately assessing visual acuity is important for many reasons. It allows the clinician to:
- Determine best-corrected acuity with refraction.
- Monitor the effect of treatment or disease progression.
- Estimate the dioptric power of optical devices needed for reading regular-sized print.
- Verify eligibility for tasks such as driving.
- Verify eligibility as legally blind.
When measuring distance acuity, measuring visual acuity in a darkened room is no longer necessary. In the past, when projected charts were used, the room lights had to be lowered for better contrast on the chart. Now, with high-definition LCD monitor acuity charts and ETDRS charts, contrast is no longer an issue. Additionally, for some patients, particularly those who have difficulty adjusting to low-light conditions, taking them from a normally-lit waiting room into a darkened clinic or workup room will artificially lower their acuity. Because clinical decisions are based on these acuity measurements, accurate assessment of each person’s acuity is critically important.
With this in mind, all acuity testing should be done with the overhead lights on in the exam or workup room; however, if the patient you are working up complains of photophobia and asks you to lower the lights or asserts the need to put on their sunglasses, accommodate them accordingly. Simply note that the recorded acuities were taken in conditions that deviated from the standard.
“Lights on” During Retinoscopy
When doing retinoscopy, you will want the lights lowered; but, once you start your refraction, you will achieve greater accuracy when you refract with the lights on. Keeping the lights on during your refraction is important to avoid over-minusing your patients. When someone is over-minused, the chart will look darker, which can be mistakenly thought of as looking clearer.
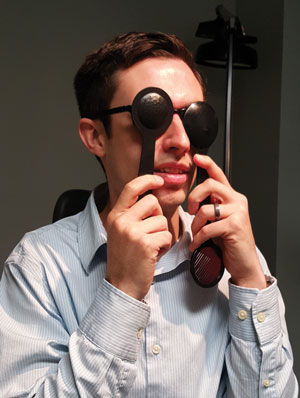 | |
| Pinhole acuity is useful for patients without underlying ocular disease. Photo: Marc B. Taub, OD. |
Pinhole Visual Acuity
For individuals without ocular disease, a pinhole aperture is a useful tool for determining if a refractive error is present or if a refractive change is needed. The most useful pinhole diameter for clinical purposes is 1.2mm. This pinhole size is effective for refractive errors of +/-5.00D. A pinhole improves visual acuity by decreasing the size of the blur circle on the retina, resulting in an improvement of the individual’s visual acuity; however, if the pinhole aperture is less than 1.2mm, the blurring effects of diffraction around the edges of the aperture will increase the blur circle and cause worsened vision.
Because the reduced amount of light entering through the pinhole makes the chart less clear for individuals with macular disease and other ocular diseases that affect central vision, they may have the same, or even reduced, acuity when looking through a pinhole. It can also be difficult to use eccentric fixation through a pinhole. For this reason, individuals with ocular disease may still benefit from a spectacle correction change and should not be told otherwise based solely on their acuity when looking through a pinhole. Careful retinoscopy, along with trial frame refraction, is needed to determine whether an individual with pathology-induced vision loss will benefit from a spectacle correction change.
Standard Subjective Refraction Techniques
The goal of the subjective refraction is to achieve clear and comfortable binocular vision.
The clinician’s ability to maintain control during the refraction is directly related to their ability to communicate clearly with the patient.
The subjective refraction starts after retinoscopy or autorefraction, which provide the clinician with an objective assessment of refractive error. It is possible to start with the patient’s previous prescription; however, this is the least desirable way to begin, as there is no objective information about the patient’s current refractive error. Thus, the best starting point is from the objective determination of refractive error by retinoscopy.
Whether you start your refraction after retinoscopy, or with autorefraction findings, you will first check acuity in each eye separately before the Initial Maximum Plus to Maximum Visual Acuity (MPMVA) step.
Set up for Retinoscopy—Minus Cyl Phoropter
- Before putting the phoropter in front of the patient, clear the phoropter, set the cylinder axis at 180 degrees and unocclude both eyes.
- After positioning the phoropter in front of the patient, level the phoropter and make sure the interpupillary distance is properly adjusted.
- Put either a group of letters or a fixation dot on the chart and direct the patient to look at the chart, not at you or your light.
- Ask the patient to tell you if your head blocks their view of the chart.
| Reading the Fine Print It is important to know that when doing near acuity testing, reduced Snellen acuity is only accurate at a fixed testing distance, which is 40cm for most near acuity cards. You should also know that Jaeger numbers have no precise meaning. Jaeger numbers refer to item numbers in a printing catalog in Vienna in the 1850s. The International Council of Ophthalmology has stated that the lack of external definition of Jaeger numbers makes them extremely variable. With this in mind, Jaeger numbers should not be used for near vision testing. The preferred method for near acuity testing uses the M-unit, which is the only letter size unit that is well defined. A 1M letter subtends five minutes of arc at 1M. For reference purposes, a 1M-sized letter is equivalent in size to newsprint, while 2M is equivalent in size to standard 18-point large print and 0.5M is equivalent in size to print half the size of newsprint. When measuring near visual acuity, the patient will use their reading correction. Have the patient hold the reading card at their normal reading distance. The clinician should note errors related to scotomas and visual field loss. Near acuity is recorded as M-units at the testing distance (e.g., 1.25M at 40cm). Measuring visual acuity at each clinic visit is standard of care. Documentation of visual acuity is important to defend against an accusation that a procedure or treatment harmed vision. |
Retinoscopy
- For patients with an unknown refractive error, start with a vertically-oriented Plano mirror streak (sleeve up on Copeland and sleeve down on Welch-Allyn) to streak the horizontal meridian.
- As you begin streaking the horizontal meridian, if your retinoscopic streak does not line up with the retinal reflex, rotate your streak until the streak and the reflex are aligned. Continue streaking along this meridian.
- Neutralize this meridian by adding plus lenses for “with motion” or minus lenses for “against motion.”
- Once neutralized, rotate your retinoscope’s streak 90 degrees from where your streak was previously aligned with the retinal reflex.
- Now, with this streak more horizontally oriented, streak the more vertically-oriented meridian.
- If your patient has no astigmatism, there will be no motion. Retinoscopy is completed for this eye.
- If your patient has with-the-rule astigmatism, you will see “against motion,” which you will neutralize by adding minus cylinder axis 90 degrees away from the initial meridian you neutralized.
- If your patient has against-the-rule astigmatism, you will see “with motion.” If this is noted, neutralize it by adding plus spherical power.
- For against-the-rule astigmatism, after neutralizing this second meridian with sphere power, rotate the cylinder axis 90 degrees, back to the initial meridian.
- Next, rotate your retinoscope’s streak back to this more vertically-oriented position. You should now see “against motion” in the more horizontal meridian, which you will neutralize by adding minus cylinder.
- Once you have neutralized the right eye, do the same for the left eye.
- When you have neutralized both eyes by retinoscopy, remove your working distance lens from each eye (1.50D for a 66cm working distance or 2.00D for a 50cm working distance).
Initial Maximum Plus to Maximum Visual Acuity
- Next, occlude the left eye, put several lines of letters on the eye chart, such as 20/20 to 20/50 or 20/15 to 20/40, and ask the patient to read the smallest line they can.
- Assuming the patient can read the letters being presented, begin by adding +0.75D to the phoropter. This should result in the loss of two to three lines of vision.
- If there is no loss of vision, add another +0.75D and make sure there has been a decrease in vision by two to three lines from your starting point.
- Next, slowly decrease the power in the phoropter (less plus or more minus), in 0.25D steps, until the patient is able to see the 20/20 or 20/15 lines, or until there is no further improvement in vision. Expect about a one-line improvement on the eye chart for every -0.25D added.
- Once you have achieved the initial maximum plus to maximum visual acuity, the patient’s cylindrical correction can be refined.
Refining Cylinder/Axis and Power
- Swing the Jackson cross-cylinder (JCC) in front of the patient’s eye to refine cylinder axis and power.
- As a general rule, if the patient’s refractive error is primarily cylindrical, or if by retinoscopy or autorefraction you found 1.00D of cylinder or more, start by checking the cylinder axis first. Otherwise, start by checking the cylinder power.
- To check the cylinder axis first, position the JCC so that the white and red dots straddle the cylindrical axis by 45 degrees on either side.
- Have the patient look at either a single line of letters one line larger than their best visual acuity found during the initial MPMVA, or the same grouping of letters you started with.
- Tell the patient, “I am going to give you two choices. Neither will be perfectly clear; however, I want you to tell me which lens choice is clearer: choice one or choice two; choice three or choice four? And so on.”
- Be sure to use fresh choices and new numbers with each pair you present.
- Move the axis in the direction of the red dot, initially in 15-degree increments, for individuals with 2.00D of cylinder or less. You will decrease the increment size following a reversal by 15-10-5-3-1 degrees as the axis is refined.
- For individuals with more than 2.00D of cylinder, start with 5-degree increments, decreasing the increment size following a reversal by 5-3-1 degrees until the axis is refined.
- To check cylinder power, adjust the position of the JCC so that the white or red dots correspond with the cylinder axis.
- Ask the patient, “Which lens choice is clearer: choice one or choice two?”
- If the patient chooses the white dot, subtract -0.50D of cylinder power while remembering to add -0.25D of spherical power to maintain the spherical equivalent.
- If the patient chooses the red dot, add -0.50D of cylinder power and add +0.25D of spherical power to maintain the spherical equivalent.
- Once the patient reverses (i.e., chooses the red dot after previously choosing the white or vice-versa) adjust the cylinder power by 0.25D in the opposite direction of your previous change. The spherical power does not need to be adjusted for this 0.25D change.
- Once more, check the cylindrical power with the JCC to see if the patient wants more or less power. The goal is to give the least amount of cylindrical power that provides the clearest vision.
- When the cylindrical power and axis have been refined with the JCC, remove the JCC from in front of the patient’s eye and ask the patient to read the smallest line they can.
- Remember, if the starting cylinder power is 1.00D or greater, check the cylinder axis first. You will only check the cylinder power first for cylinder powers less than 1.00D.
Cylinder Power Search
If retinoscopy or autorefraction indicated no cylinder was needed and you suspect otherwise, do a cylinder power search.
- With your JCC oriented for power at 90 and 180 degrees, ask the patient, “Which is better: choice one or two?”
- If the patient indicates no preference, repeat at 45 and 135 degrees.
- If the patient indicates a preference, add -0.50 cylinder at the axis where the red dot is oriented, along with +0.25D sphere power to maintain the spherical equivalent.
- Using the standard JCC technique described above, refine the cylinder power and axis.
Favorite Phrases
|
Second Maximum Plus to Maximum Visual Acuity
This step is performed when the cylinder power has changed by 0.50D or more, or if the cylinder axis has changed by 10 degrees or more during cylinder power and axis refinement.
- Begin by adding +0.50D to the phoropter. The patient should lose about two lines of vision. If the acuity is the same or better, add another +0.50D until the vision is blurred by one to two acuity lines.
- Next, slowly decrease the power in the phoropter in 0.25D steps until the patient is able to see the 20/20 or 20/15 line, or until there is no further improvement in vision.
- Occlude the right eye while unoccluding the left. Repeat the same process for the left eye, beginning with the Initial MPMVA.
Binocular Balance
Once the monocular subjective refraction has been completed for each eye, it is time for the binocular balance. Binocular balancing is only done when the visual acuity is relatively equal between the two eyes.
Binocular balancing can be accomplished in two different ways: using the Risley prism on the phoropter or by alternate occlusion (described below).
- In either case, you should start the binocular balancing procedures by adding +0.75D sphere to both eyes so that the patient’s visual acuity is blurred to the 20/30 to 20/40 levels. By slightly blurring vision in this way, eye dominance is effectively neutralized during the balancing process. It is important to make sure the patient is mildly blurred before using the Risley prism or alternate occlusion binocular balancing techniques.
Risley Prism Binocular Balancing Technique
- Using the Risley prisms, apply three prism diopters base up in front of the right eye and three prism diopters based down in front of the left eye. This will result in the right eye seeing the lower image and the left eye seeing the upper image.
- Asking the patient to ignore brightness differences (this can be confusing for some patients), have them tell you which image appears clearer. Add +0.25D to the clearer eye to fog it further.
- Again ask the patient which image is clearer and add +0.25D to the clearer eye.
- The endpoint is reached when either both sets of letters look the same or when the dominant eye appears slightly clearer than the non-dominant eye.
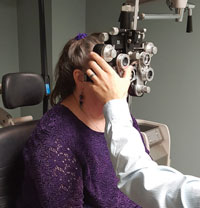  | |
| Leaning to see the chart better while in a 10-foot exam room can be equivalent to a one-line or more improvement in vision. For the sake of accuracy, the patient should sit back in the exam chair—no leaning forward. Photos: Marc B. Taub, OD. |
Alternate Occlusion Technique
- After fogging the patient, alternately cover one eye and then the other, while asking the patient which eye sees the chart more clearly, eye one or eye two. To avoid confusion, say “eye one” or “eye two” rather than “right eye” or “left eye” while you alternately occlude. Add +0.25D to the clearer eye to fog it further.
- The endpoint is reached when both sets of letters look the same or when the patient’s dominant eye appears slightly clearer than their non-dominant eye.
Determining the Final Correction
- Once the binocular balance is completed, add -0.25D OU one step at a time to bring the patient back to their best visual acuity. Remember, you should expect about one line of improvement in vision with each -0.25D addition.
- Do not give additional minus spherical power without an improvement in acuity.
Duochrome Test
The duochrome (red-green) test can be used as a monocular or binocular test to determine the proper spherical power.
- If the letters on the green side of the chart appear blacker, add +0.25D. If the letters on the red side of the chart appear blacker, add -0.25D.
- The endpoint is reached when the letters appear equally black on both the red and green side. It is important to ask the patient to tell you on which side the letters look “blacker,” not on which side they look “clearer” on.
20 Troubleshooting Tips for ‘Eyeglass Checks’
|
Refracting in a Shorter Room
Shorter examination rooms are common outside of pediatric practices. A shorter room is considered a room less than optical infinity, which is 20 feet or 6m. It is important to recognize that when refracting in a shorter lane, vergence and accommodation are in play.
To calculate vergence, use the formula 1/x (m), or 100/x (cm) or 40/x (in). Given this, the vergence demand in a 10-foot exam room is 40/120 = 0.33D. Therefore, when testing acuity in a 10-foot lane, the patient is effectively getting an extra -0.33D of refracting power from the shorter room. With this in mind, for every patient refracted and focused at infinity in a shorter exam room, additional minus power needs to be added to what was found in the phoropter. For example, add -0.25D for a 10-foot exam room. Add -0.50D for a six-foot exam room.
Consider what happens when testing visual acuity in a shorter exam room. In a shorter room, the patient is getting, at the least, an extra -0.25D of improvement in their vision on the eye chart. This is why someone can have 20/20+2 entrance acuity and still need an extra -0.50D in his or her final prescription to see with 20/15 acuity. Be aware that the acuity charts in shorter exam rooms are adjusted to the correct letter height for the room’s testing distance, so the visual acuity measured in a shorter exam room is the correct acuity.
Finally, with respect to visual acuity testing, it is important to understand that when a patient leans in to see the chart better, the testing distance can be 12 to 20 inches less. A lean of 16 inches while in a 10-foot exam room is equivalent to a one-line improvement in vision. For the sake of accuracy, it is important to have the patient sit back in the exam chair—there should be no leaning forward in an attempt to see the chart better.
Cardinal Rules of Refraction
Our ultimate goal is to make both images looked the same, yet we continually are asking the patient to determine which is better, knowing that the decision gets harder as we get closer to our goal of equality. The principles below will help avoid frustration for both doctor and patient:
- Refraction is both an art and a science. Given this, it is important to know that patients do not always respond accurately during testing with the Jackson cross cylinder and during duochrome testing. This is why starting with an objective assessment of the patient’s refractive error will help you stay on target with your refraction.
- Keep it simple—avoid needless detail or jargon when describing what you are doing.
- Maintain your patience—to avoid frustration, go slowly when needed and try to make the choices as easy as possible.
- Provide encouragement—particularly when working with patients who are hard to refract.
- Proceed with a purpose—do not offer more choices than are necessary to establish your endpoint. Boredom and fatigue can result in poor subjective responses.
Though optometry has made enormous strides in expanding its scope of practice, refraction is its lifeblood. Such an inherently subjective experience is never going to be as precise as we may hope, but adopting a standardized protocol such as this will help remove some the variables that lead to suboptimal results.
Dr. Wilkinson is a clinical professor in the department of ophthalmology and visual sciences at the University of Iowa’s Carver College of Medicine. He is also director of the institution’s vision rehabilitation service.