Don’t be part of that statistic! Use these valuable tips to refresh your memory and remind yourself how gonioscopy can enhance the quality of your patient care.
Which is Better...Three or Four?
 | ||
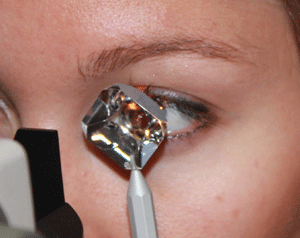
| 1. To apply the Goldman three-mirror lens, first anesthetize the
ocular surface and then ask the patient to look up. Retract the lower lid. Tip the lens with the coupling solution toward you, and begin to place the bottom edge of the lens on the eye. | ||
 | ||
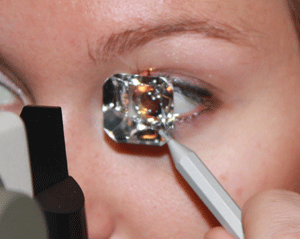
| 2. When using the three-mirror lens, ask the patient to look
straight ahead. Then, tilt the lens forward so the entire lens is in contact with the eye. | ||
| ||
| 3, 4. An example of a Posner four-mirror goniolens with a handle.
Holding the lens in a square configuration against the eye with the correct amount of pressure can provide clear views of all four quadrants of the anterior chamber angle (top). Or, you can hold the four-mirror lens against the eye in a diamond configuration. However, the sharp corners of the lens may be uncomfortable against the patient's eyelid (bottom). |
By comparison, the four-mirror lens allows the examiner to view all quadrants simultaneously. Some lenses designs, such as the Goldmann-style three-mirror, feature a single, “thumb-shaped” mirror with an angle of 62°; larger corneal contact diameters (12mm); and a steep radius of curvature (typically 7.38mm).
Most often, these lenses require the use of a coupling solution to prevent large bubble formation in the lens concavity. The coupling solution provides the examiner with crisp, clear views, but the solution will likely drip down the patient’s face. Thus, it is advisable to fill the concave portion of the lens only half way, as well as instruct the patient to minimize movement during the procedure.
The coupling solution enhances adhesion between the goniolens and the patient’s cornea, which makes it easier to maintain contact against the eye. If the additional adherence makes the lens difficult to remove, ask the patient to squeeze his or her lids firmly. Then, gently push on the globe through the eyelid to release the lens.
Smaller corneal contact diameter lenses, such as a Sussman four-mirror, do not require coupling solution; however, it’s more difficult to maintain contact with the cornea. Further, unwanted bubble formation is common.
Do You Have a Handle on It?
Four-mirror gonioscopy lenses are available either with or without a handle. Some examiners believe that the use of a handle provides extra stability. Tall examiners with long arms, for example, may find a lens without a handle to be more user-friendly, while practitioners with shorter arms may benefit from using the handle. When performing four-mirror gonioscopy, hold the lens squarely against the patient’s eye instead of in a diamond configuration (figure 3). Otherwise, the lens’ sharp corners can cause significant discomfort around the patient’s eyelids (figure 4).Not Just for Traditional Glaucoma Suspects
A Van Herick estimation alone is insufficiently accurate to evaluate the anterior chamber angle. When a patient’s intraocular pressure is elevated, the next logical step is to take a closer look at the anatomical location where much of the aqueous fluid is drained.Glaucoma suspects may exhibit narrow angles or material (e.g., pigment or pseudoexfoliative debris) in the posterior portion of the trabeculum. While performing gonioscopy on traditional glaucoma suspects is arguably standard of care, remember that gonioscopy is necessary in other circumstances as well.
• Ischemic conditions. Perform gonioscopy on patients with a history of an ischemic eye disease—such as diabetes, central retinal artery occlusion, branch retinal vein occlusion or central retinal vein occlusion—to check for neovascularization of the angle. Normal blood vessels in the angle are oriented radially, whereas fibrovascular membranes with neovascular blood vessels appear thin, fine and irregularly positioned. Further, the new vessels tend to grow from the iris surface into the angle. When the vessels constrict, they pull the iris up into the angle. Consequently, this process causes acute angle closure and a severe intraocular pressure spike.
• Trauma. Patients with a history of recent blunt force trauma should be examined for angle recession or iris tears after the eye has stabilized. However, gonioscopy is contraindicated when a patient has a fresh hyphema or perforated globe. Any patient with a history of iritis should be evaluated for the presence of peripheral anterior synechiae. Additionally, foreign bodies or tumors that develop in the anterior chamber angle can be identified through a gonioscopic examination. Many congenital anomalies, such as iridocorneal endothelial or Axenfeld-Rieger syndromes, can be further evaluated via gonioscopy.
• Retinal examination. Many practitioners forget that a Goldmann three-mirror goniolens can be used to provide a magnified, detailed view of any retinal or vitreal anomaly identified during ophthalmoscopy. Using the three mirrors (positioned at various angles) and the central lens, the examiner can stereoscopically evaluate any area of the posterior segment––from the macula to the ora serrata and pars plana.
Push It
Indentation (or compression) gonioscopy with a small-diameter, four-mirror lens is useful to differentiate peripheral anterior synechiae (when the iris is physically stuck to the angle) from an appositional angle closure (when the iris rests against the angle).To perform dynamic indentation gonioscopy, simply use the small surface area of the four-mirror lens to gently push against the center of the cornea. This temporary pressure increase will cause the base of the iris to move away from the angle.
If the angle closure is due to a peripheral anterior synechiae, the iris will remain attached and its structures will not be viewable. Indentation gonioscopy also is helpful in diagnosing plateau iris, or for temporarily increasing trabecular outflow when a patient has an angle closure attack.
Be Real
Extra pressure applied to the eye when performing gonioscopy can lead to a temporary IOP reduction. So, always perform tonometry before gonioscopy.When evaluating narrow angle suspects, be sure to decrease the room illumination as much as possible. In patients with narrow angles, it is most effective to view the iris insertion and subsequent angle structures when the pupil is large. Initially, a brighter beam may be helpful in obtaining a comprehensive view of the structures. Subsequently, however, be certain to reduce the illumination and use a relatively thin slit beam. Otherwise, additional illumination may constrict the pupils, widen the angles and possibly lead to a misdiagnosis.
Applying excessive pressure on the sclera, which often occurs when using a large-diameter goniolens, can artificially narrow the angle. On the other hand, applying too much pressure to the central cornea with a small-diameter lens can inadvertently open the angle and lead you to mistake the angle’s natural appearance.
If you see corneal folds or blood in Schlemm’s canal, it means you’re pressing too hard. (Be aware that blood in Schlemm’s canal also happens in cases of elevated episcleral venous pressure, e.g., ocular hypotony, Sturge-Weber syndrome or carotid-cavernous fistulas.)
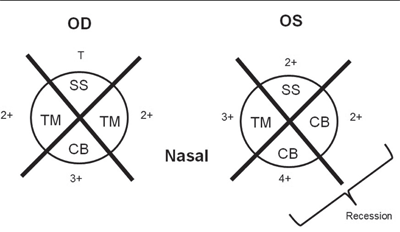 |
‘X’ Marks the Spot
Most examiners document gonioscopy in the examination record by using two crossed lines in the shape of an “X” to denote all four quadrants of the anterior chamber (figure 5).Be sure to record the most posterior structure observed. Also, if you use a grading scale, note which one you used to avoid any confusion.
For example, the Scheie classification system defines grade I as open and a grade IV as closed, whereas the Shaffer classification system defines grade IV as open and grade I as nearly closed. Generally, the inferior quadrant is the widest. So, most practitioners begin the gonioscopy examination by using the mirror in the 12 o’clock position to view the inferior angle.
The most posterior structure is the ciliary body band, which may appear gray or brown. Myopes tend to have a wider ciliary body, while hyperopes may exhibit a narrow or absent ciliary body band. The bright white scleral spur is located just anterior to the ciliary body, and is usually a prominent landmark for the identification of angle structures. Because the scleral spur can be obscured by iris processes, it may not be easily observed in all patients. However, if it is visible, the chance of angle closure is rare.
The trabecular meshwork is the next structure seen. It appears tan to dark brown, and is where the majority of aqueous fluid drains from the anterior chamber. Pigment is most likely to accumulate in the posterior portion of the trabecular meshwork. If pigment is seen, it should be recorded in each quadrant on a scale from 0 (no pigment) to 4+ (dense pigment accumulation).
The most anterior structure is Schwalbe’s line. This thin band marks the termination of Descemet’s membrane. Schwalbe’s line protrudes into the anterior chamber, and creates a ridge that may accumulate pigment. A significant pigment deposit in this location is termed Sampaolesi’s line, which often is prominent in patients with pigment dispersion syndrome, pigmentary glaucoma, pseudoexfoliative syndrome or pseudoexfoliative glaucoma.
Last but not least, document the iris configuration as convex (steep), regular (flat) or concave. Keep in mind that the iris normally appears slightly convex. Hyperopic patients may exhibit an even more convex insertion, whereas myopes or patients with pigment dispersion syndrome may have a concave structure. If you have difficulty getting a view of the angle due to its structure, ask the patient to look in the direction of the mirror being used or tilt the gonioscopy lens away from the mirror being used.
Although gonioscopy can be a valuable tool, it has become a lost art for some practitioners. Statistics show that many practitioners neglect to use it.1,2 So, go back to gonio! It is a critical diagnostic tool that can be part of your routine examination.
Dr. Dinardo is an assistant professor at the Michigan College of Optometry in Big Rapids. Dr. Walling is a professor and chief of the Medical and Surgical Service at MCO’s University Eye Center.
1. Hertzog LH, Albrecht KG, LaBree L, Lee PP. Glaucoma care and conformance with preferred practice patterns. Examination of the private, community-based ophthalmologist. Ophthalmology. 1996 Jul;103(7):1009-13.
2. Fremont A. Patterns of care for open angle glaucoma in managed care. Arch Ophthalmol. 2003 Jun;121(6):777-83.