Polish Your Dx SkillsNo matter how long you've been in practice, it's always worthwhile to brush up on your diagnostic techniques and incorporate newer ones when you can. This month in Review of Optometry, experts review how to refine your slit-lamp skills, distinguish between optic nerve differentials, use head-mounted perimetry and pay closer attention to detail in peripheral fundus photos. Check out the other articles featured in the February 2024 issue: |
In today’s fast-paced world, patients may be quick to decline dilation because they might not consider it as important as their refractive needs; however, assessing the fundus, particularly the periphery, is critical in providing excellent eye care. There is now new imaging technology and diagnostic lenses to aid in the evaluation and diagnosis of retinal diseases better than ever before. Although photography is an excellent screening technique, dilation with funduscopic examination is still required to manage retinal disorders adequately. Here is an overview of tips and pearls for evaluating the peripheral retina.
Where Am I in the Periphery?
Prior to diving into the peripheral retinal, it’s crucial to become familiar with its landmarks and unique vascular supply. The posterior pole is made up of the optic nerve head, macula and vascular arcades. The retina is supplied by both the central retinal artery and choroidal blood vessels, with roughly 20% to 30% of the retina flowing through the central retinal artery from the optic nerve head and nourishing the inner retinal layers as it splits into four main branches.1
The choroid, conversely, supplies roughly 65% to 85% of ocular blood flow and maintains the blood supply for the outer retina, which is vital in providing nutrients to photoreceptors.1 Additionally, the arterial intraretinal branches supply the three capillary networks of the retina: the radial peripapillary and the inner and outer layers, which are most dense in the posterior pole and decrease in density as the supply becomes more peripheral. This is paramount when trying to better understand vascular retinal diseases. For instance, diabetic retinopathy is more likely to be found in the posterior pole because of microvascular complications that affect the capillary network.
The midperipheral retina extends from the vascular arcades to the posterior edge of the vortex vein and ampulla. These latter structures (the vortex veins and ampulla), which are found in the oblique quadrants of the retina, serve as excellent identifiers between the midperiphery and periphery.2
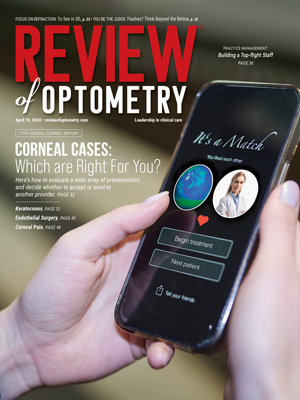
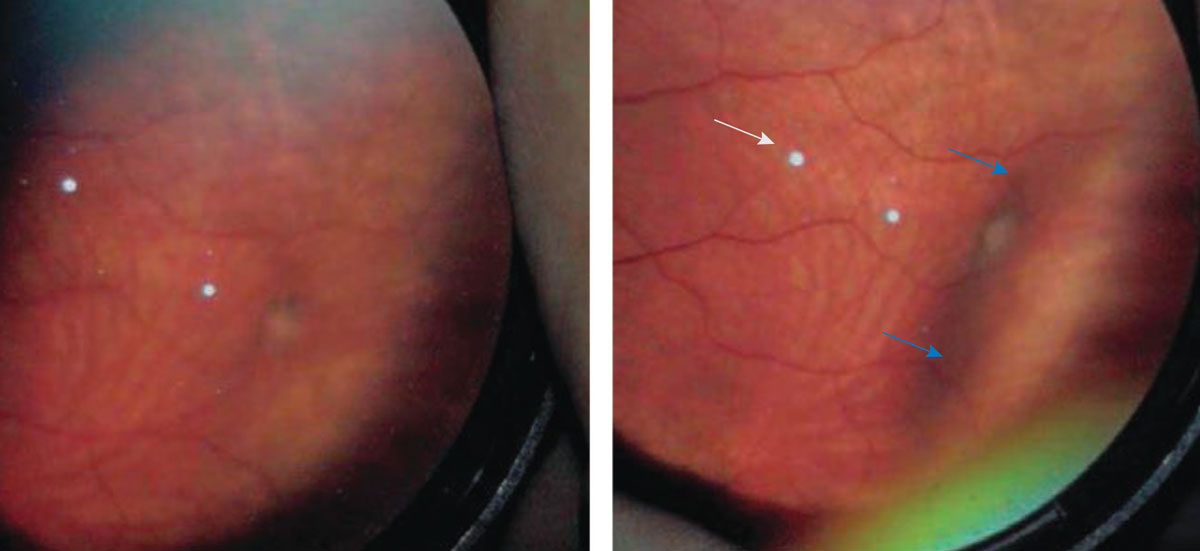
These veins drain the blood supply from the posterior ciliary arteries and penetrate the sclera to merge into the central retinal vein. You might also observe the long posterior ciliary nerves in the temporal and nasal aspects of the midperiphery, which appear yellow in color.2 They can be used as a horizontal divider between the superior and inferior retina. The short posterior ciliary nerves located directly superior and inferior can act as a vertical divider, as seen in Figure 1.2
 |
|
Fig. 1. Black arrows mark the long posterior ciliary nerves; the yellow arrow marks the short posterior ciliary nerve. Click image to enlarge. |
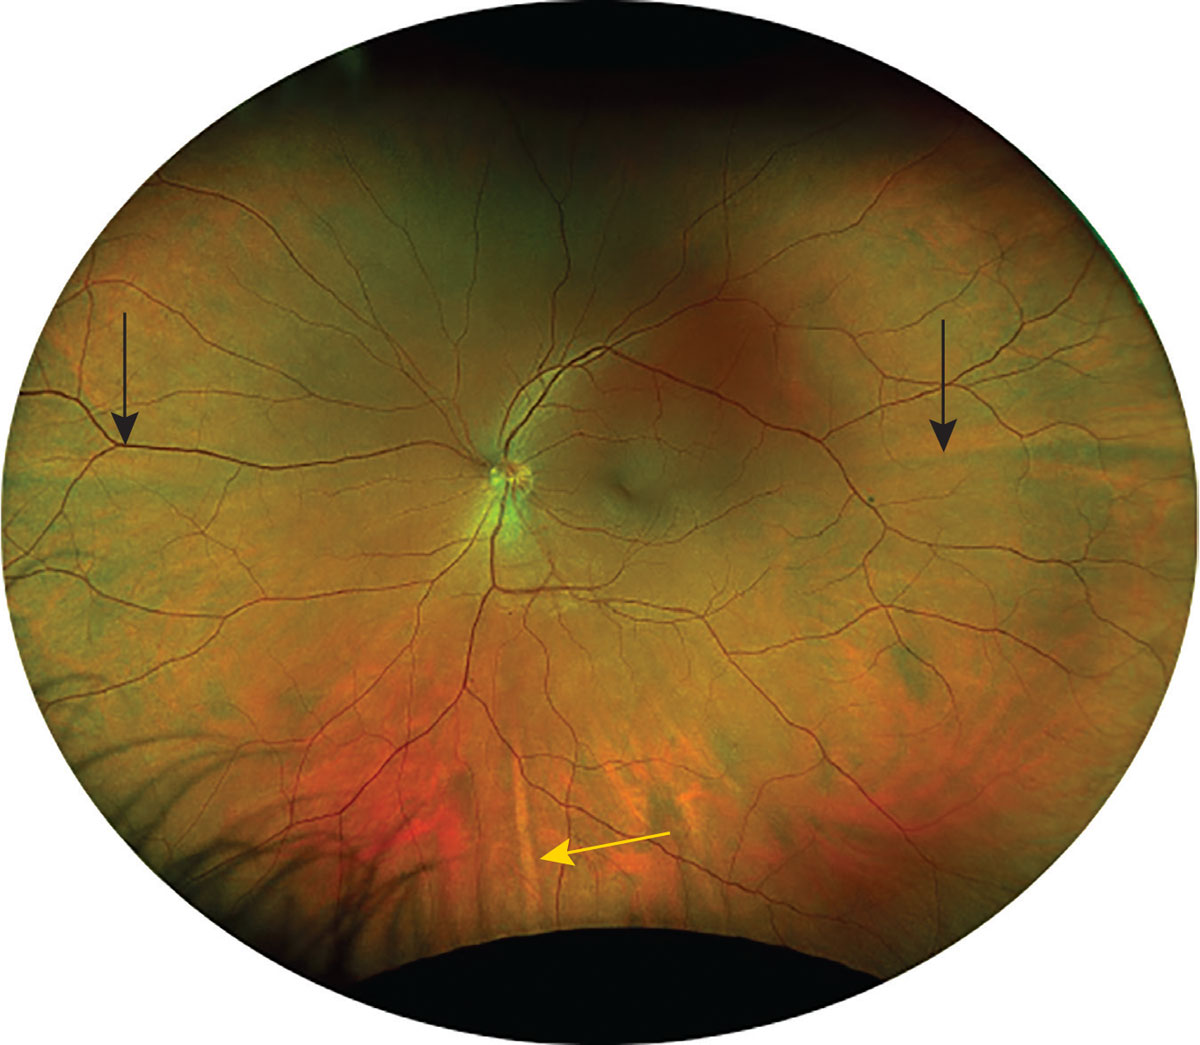
The far periphery is defined as the anterior edge of the vortex vein and ampulla and beyond to the pars plana. The ora serrata, seen in Figure 2, comes into view when you approach the peripheral retina. This structure is made up of dentate processes (retina) and bays (pars plana), which act as the serrated junction between the retina and the ciliary body.2 The dentate processes will appear as white or iridescent spikes, whereas ora bays appear as darker-colored scallops. The strongest connection of the vitreous to the retina is the overlaying vitreous base, which extends anteriorly and posteriorly to the ora serrata. This 3mm-to-6mm wide region crossing the ora might be more noticeable in people with darker fundi.2
 |
|
Fig. 2. This Optos photo shows an area of ora serrata at temporal retina (marked by red arrows) and the mid-peripheral vortex veins (marked by blue arrows). Click image to enlarge. |
What Techniques Do I Use?
There are a couple options to choose from.
Binocular indirect ophthalmoscopy (BIO). When performing a peripheral retinal exam, BIO offers a larger field of view than slit lamp biomicroscopy. The retinal images are upside down and reversed during BIO, and this is true for slit lamp funduscopy as well. The alignment of the optical seeing system, which consists of the patient’s retina, the instrument, the examiner and the condensing lens, is essential in obtaining good BIO views. Examiners need to verify that the pupillary distance on the headset is accurate and can be changed as necessary. This will aid in achieving binocularity, allowing the examiner to view the retina with stereopsis, a vital part to assess pathology for characteristics such as elevation.
A patient with completely dilated pupils would benefit from the BIO’s largest light aperture, which can be reduced in patients with smaller pupils to minimize glare. There are a variety of condensing lenses ranging from +14D to +30D that can be used, with the field of view getting smaller as the magnification increases. The most commonly used condensing lens during routine eye exams is the 20D lens since it offers a good balance between magnification and field of view.
 |
|
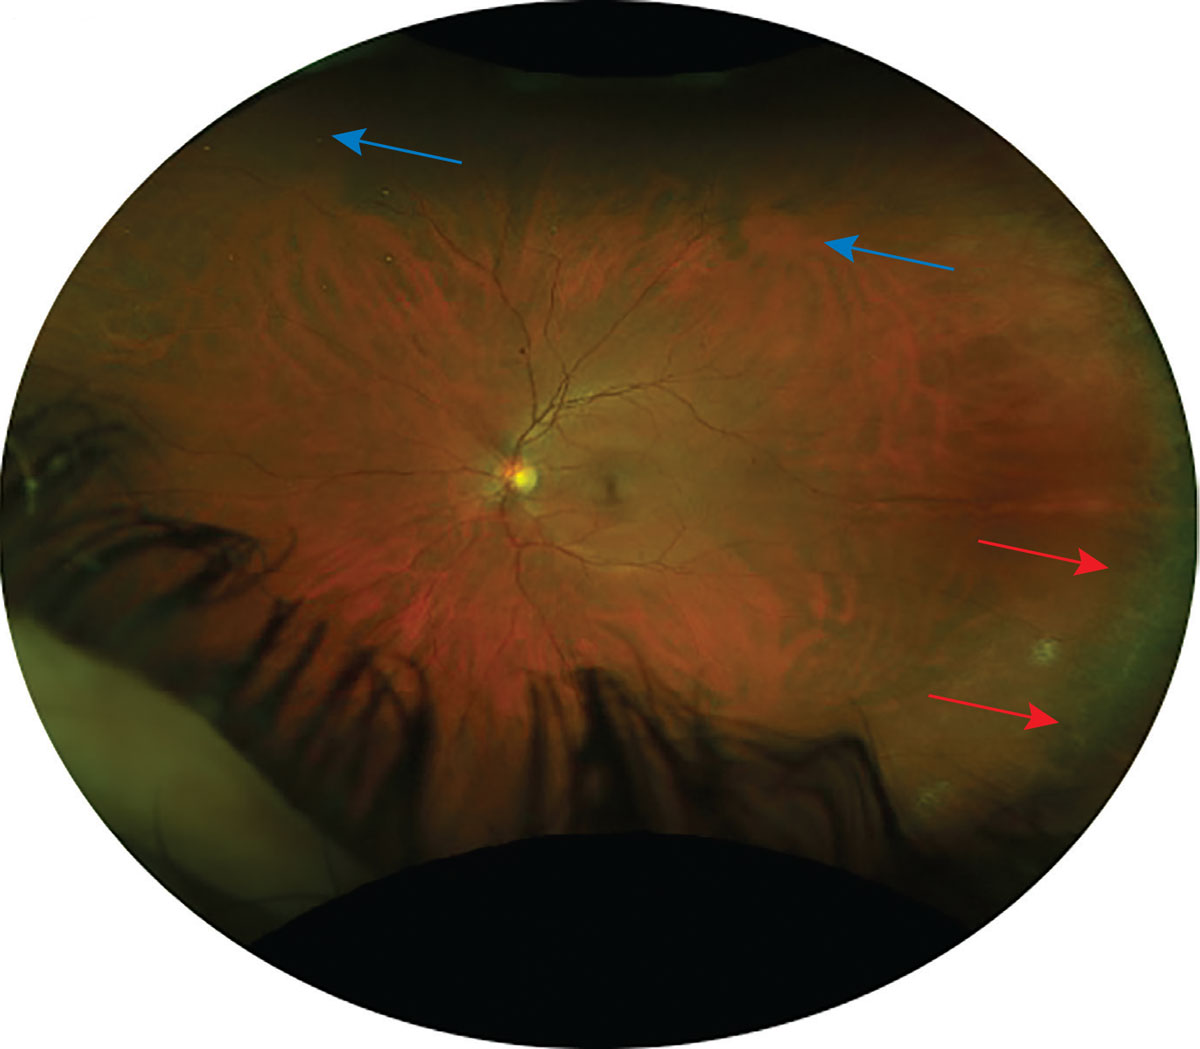
Fig. 3. An example of a provider who has positioned themselves below a reclined patient while performing BIO to observe the superior retina.3 Photo: Amy Dinardo, OD, MBA, and Philip Walling, OD. Click image to enlarge. |
When examining the far periphery, a +28D or +30D lens allows for a wider field of view, making the ora serrata easier to see. These lenses may be helpful in examining patients with smaller pupils or media opacities. These lenses require a different working distance, thus the examiner needs to hold them further away because of the lower magnification. Other lenses like the digital series can also be used to obtain views with higher resolution. Smaller spot sizes are also advantageous when examining patients with small pupils or who do not dilate well.
One of the advantages of BIO is its dynamic nature, which allows you to move and adapt your positioning based on the patient. The individual may lie down, sit up straight or be at an angle during BIO. When a patient is reclining in the examination chair, it may be simpler to face the opposite direction of the patient’s gaze when positioning yourself. For example, when viewing the superior retina, the examiner should place themselves below the patient’s head when they are looking up, as depicted in Figure 3.
Recall that as patients look off into extreme gazes, the condensing lens may not always fill completely when trying to view the far periphery. To further improve peripheral views, an examiner can instruct the patient to tilt their head slightly towards them while the patient still maintains the directed gaze. For patients who have difficulty looking where you tell them to, especially those who are in a reclining position, have them extend an arm into the field of gaze you wish to examine and instruct them to look at their hand.
Scleral depression. There are certain disease states as well as symptomatology that require adjunct testing in addition to BIO. The peripheral retina can be best visualized by using scleral depression, a technique used in Figure 4. Like other examination techniques, it is important to practice more and more to attain good views. For scleral depression, a proper dilation is done with use of 2.5% phenylephrine and 1% tropicamide. Then, wait until maximal dilation is achieved. Additionally, topical anesthetic may be used to make patients more comfortable.
 |
|
Fig. 4. This is a BIO view of a vitreal tuft. On the right is an indentation from applying a scleral depressor (marked by blue arrows) to improve the detail seen of the abnormality.3 The white dots (marked by white arrow) in both photos are lens artifact. Photo: Amy Dinardo, OD, MBA, and Philip Walling, OD. Click image to enlarge. |
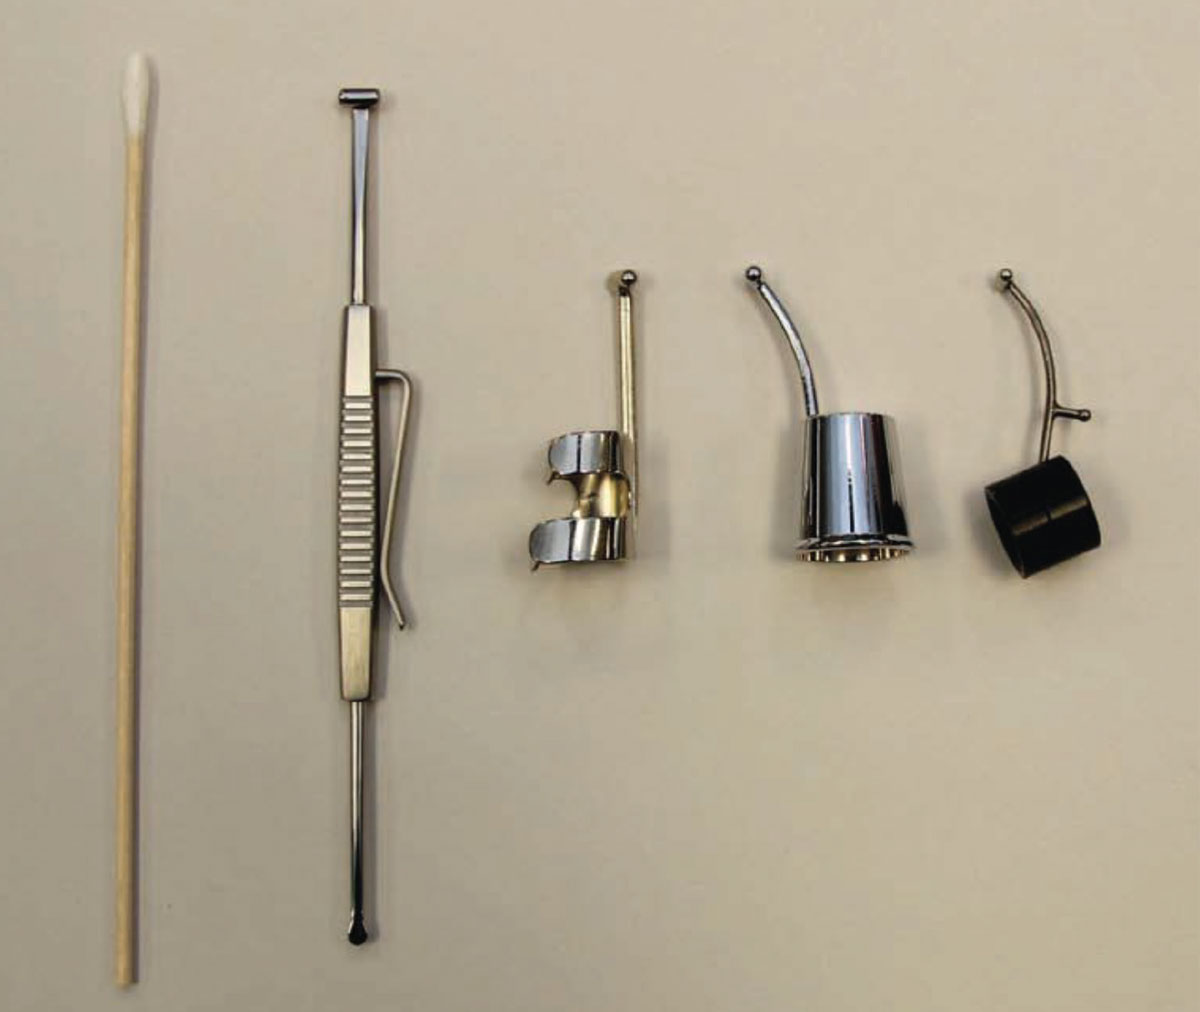
There are several different types of scleral depressors available on the market, ranging from thimble depressors to single- or double-pointed, straight or curved depressors as seen in Figure 5. Although they are convenient, cotton-tipped applicators might increase the complexity of a dynamic exam as you move circumferentially around the eye to obtain peripheral views.
Scleral depression can be performed while the patient is supine or upright and depends on the physician’s comfort level. First, apply your scleral depressor to the eyelid at roughly 5mm to 8mm behind the limbus while the patient looks in the opposite direction from the area being examined.3 Next, slowly guide the patient’s gaze in the desired direction while gently applying pressure so that the scleral depressor follows along the lid in a perpendicular fashion. If the depressor is pressing into a muscle insertion or perpendicular to the eye, the patient will start to feel uncomfortable. When aligned properly, the examiner should watch the red reflex of the pupil and look for a small shadow or area of darkening, as this indicates the depressor is in the right location.3
 |
|
Fig. 5. Different types of scleral depressors, including a cotton-tipped applicator, a flat double-ended depressor and thimble depressors.4 Photo: Jay M. Haynie, OD. Click image to enlarge. |
Then, move your condensing lens into view. There will be a bump indicative of successful alignment. For cases when it is difficult to find the bump, consider moving the scleral depressor away from the limbus and asking your patient to look slightly off axis rather than in extreme gazes; this might improve view of the retina and make it simpler to locate the bump. Some clinicians describe the bump as appearing like a “mouse under a blanket,” especially as one moves the depressor.
The easiest views to obtain with scleral depression are those of the superior and inferior retina. As for the nasal and temporal views, there are different ways to obtain these, such as using a topical anesthetic, then directly depressing onto the globe. Another method involves using the depressor to move the eyelid into the nasal and temporal aspects of the globe. This dynamic technique allows for evaluation at both three o’clock and nine o’clock without direct contact to the globe.
Scleral depression is indicated when examining patients who have symptoms or history of peripheral retinal disorders, such as a retinal break, retinal detachment, lattice degeneration, vitreoretinal adhesions, photopsia and/or sudden increase in floaters. However, it is contraindicated in those with hyphema, penetrating globe injuries or history of recent ocular surgery. Caution should be given to those with glaucoma or ocular hypertension, as scleral depression will temporarily increase intraocular pressure.
Slit Lamp Biomicroscopy and Contact/Non-Contact Lenses
A slit lamp examination can offer a higher magnification and higher quality image of the peripheral retina. There are numerous options for both contact and non-contact lenses to view the peripheral retina, with each possessing a different field of view, magnification and potential uses.
The different condensing lenses can be either high magnification or wide-angle lenses and typically have a double aspheric design to aid in improving depth of field and reducing peripheral image distortion.5 The dynamic field of vision is observed with a 15° tilt to either side of the optical axis, whereas the static field of view is the maximum view that can be seen without tilting the lens.5 When looking at the peripheral retina behind the slit lamp, the following non-contact lenses make good choices.
- 90D lens. One of the most common lenses used at the slit lamp is the 90D. Its 89° field of view and 0.76x magnification make it suitable for dynamic examinations, especially since it has a smaller diameter ring.5
- Digital Widefield lens. This type features improved stereopsis and less chromatic aberrations, thanks to its sophisticated optical lens design. In addition to improving optical clarity, it features antireflective coatings that can cut reflections and glare by up to 50% more than conventional coatings. It has a greater dynamic field of view at 124° and a magnification of 0.72x. This field of view is roughly 40% wider than the 90D.5
- SuperField lens. Also referred to as the Super 90D, this lens offers a detailed picture of the mid-periphery and even reaches the ora serrata. It has a magnification of 0.76x with a dynamic field of view of 116°, or 30% wider than a 90D lens.5
- Super VitreoFundus lens. This is a different widefield imaging lens and is perfect for checking the peripheral retina for retinal breaks or detachment because of its 0.57x lower magnification, shorter working distance and 124° dynamic field of view.5
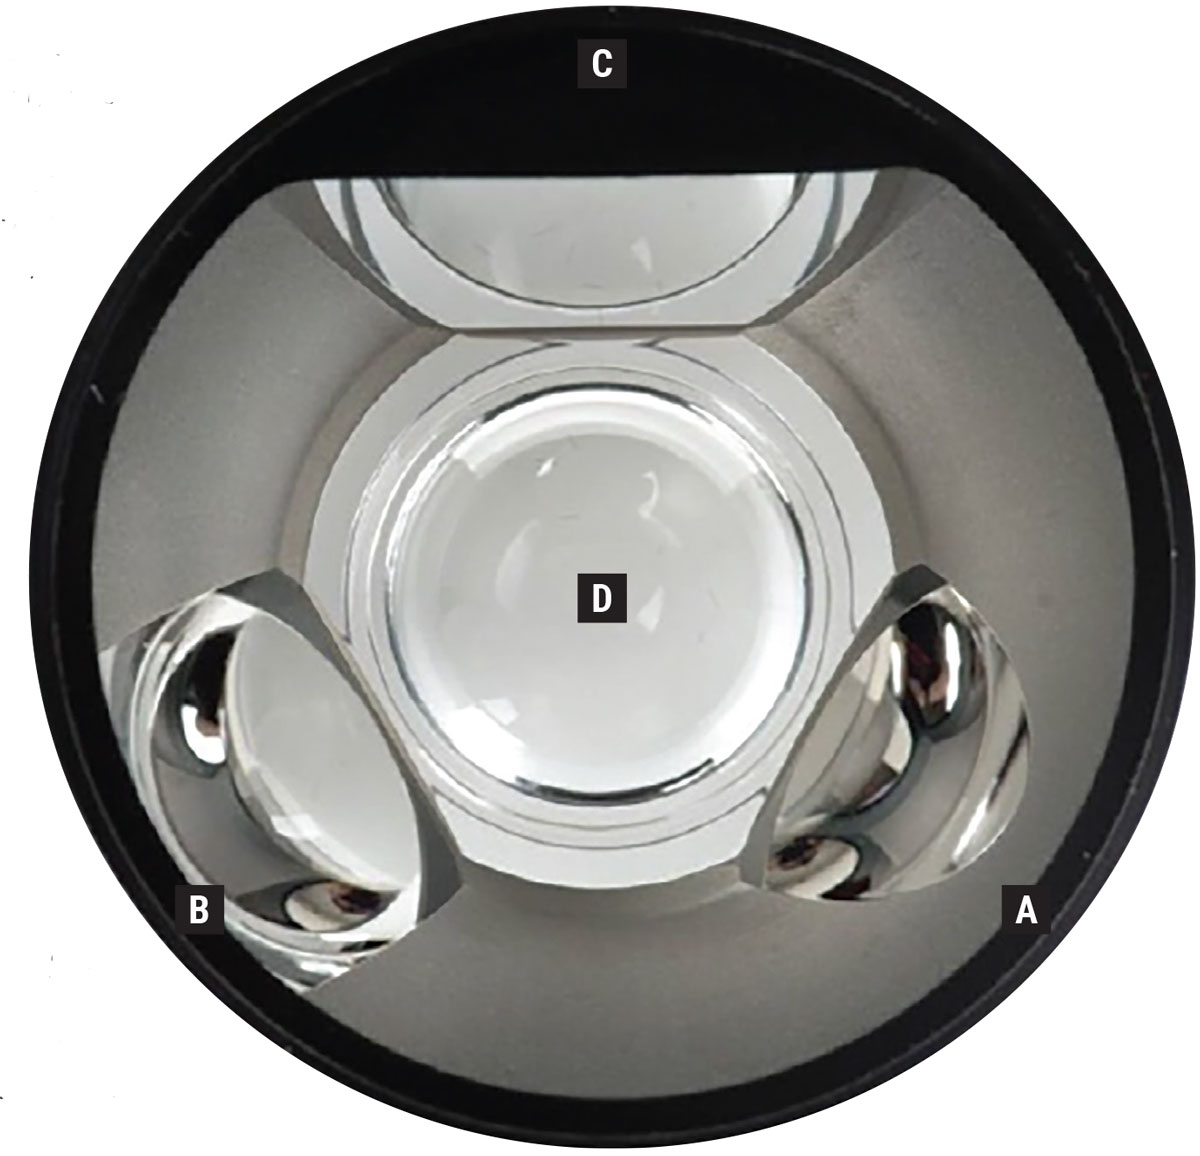
A three-mirror gonioscopy lens is a contact lens that adheres to the front surface of the eye, consisting of three mirrors and a central lens. It allows examiners to view multiple areas of the retina, as shown in Figure 6. It is necessary to anesthetize the eye and use a coupling solution like Celluvisc (carboxymethylcellulose sodium 1%, Allergan) on the inner surface of the lens before applying it to the cornea to ensure good comfort for the patient. When examining the posterior pole, the central lens has a 1.08x magnification and a 36° view of the retina.5 The trapezoid mirror (mirror C) is the largest and gives views of the midperiphery. The smaller rectangular mirror (mirror B) is used to view between the midperiphery and the periphery, and the semicircular mirror (mirror A) is the smallest and allows views of the far periphery, but is primarily used to obtain high quality views of the anterior chamber angle and its structures.
 |
|
Fig. 6. The A mirror (semi-circle) allows views of the peripheral retina and anterior chamber angle. The B mirror (rectangle) allows views between midperiphery and the periphery. The C mirror (trapezoid) allows for views of the midperiphery. Remember that the view in these mirrors is 180° away. Therefore, if you want to view a hole at six o’clock in the periphery, you would place the trapezoid mirror (mirror B) at 12 o’clock. The central (D) mirror of the three-mirror lens can also be used to get a direct (not indirect) view of the posterior pole and is useful for detailed examination of the macula and optic nerve head. Click image to enlarge. |
Widefield and Ultra-Widefield Imaging
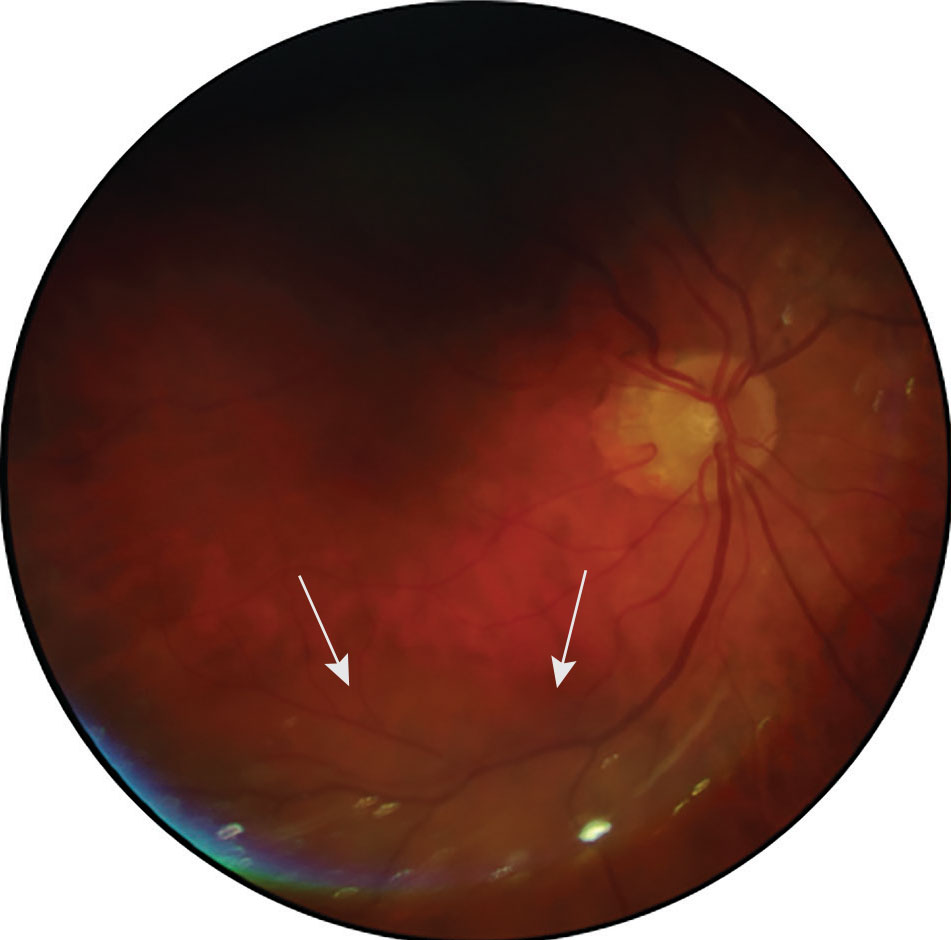
When monitoring ocular disorders such as diabetic retinopathy, maculopathies and other retinal conditions, fundus photography has widely been adopted by eyecare providers. A valuable yet incomplete picture of the retina and optic nerve can be obtained using traditional fundus photography, which covers just 30° to 50° of the retina, as seen in Figure 7.6 As a result, widefield and ultra-widefield imaging have gained popularity as testing techniques, particularly for patients who decline dilation or those in which dilation is contraindicated, such as narrow angles due to risk of angle closure.
 |
|
Fig. 7. A traditional fundus photo capturing an elevated area within the inferior retina of the posterior pole in the right eye (marked by white arrows). Click image to enlarge. |
At this time, widefield fundus imaging devices are defined as those capable of capturing a field of view between 60° to 100,° covering the retina extending from the vascular arcades to the posterior edge of the vortex vein ampulla, or the midperiphery.6 Ultra-widefield imaging devices, by contrast, differ by being defined as having a field of view between 110° to 220° and the ability to capture the anterior edge of the vortex vein ampulla to the pars plana, or the far periphery.6
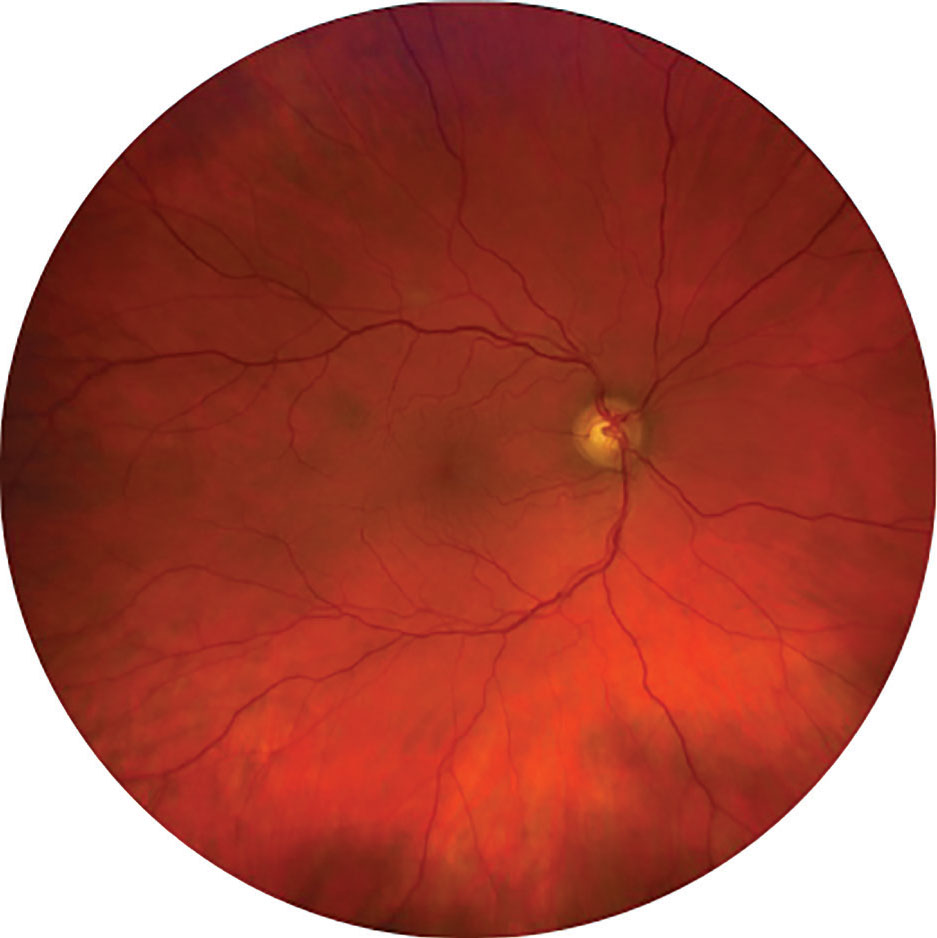 |
Fig. 8. A normal Clarus photo showing a larger field of view than traditional fundus photography. Click image to enlarge. |
Up to 133° of the retina can be captured with the Clarus ultra-widefield imaging system, seen in Figure 8.6 It proves true color imaging while using a partially confocal optics function to reduce artifact from lids and lashes. It additionally features a montage tool to aid in further piecing together peripheral findings. In contrast, the Optos can capture up to 200° of the retina using an ellipsoid microscope and confocal scanning laser, seen in Figure 9.6 If the montage feature is used by steering, it increases view of the retina up to 220°. Note that lash artifact, peripheral distortion and pseudo-coloring are common disadvantages to using Optos. No matter which system is used, one must take care to clean the mirror during the day to remove dust, which can cause artifacts.
Clinicians can now precisely document and clearly educate patients on ocular diseases like retinal holes or tears, retinal detachments, peripheral hemorrhages and more by using widefield or ultra-widefield imaging.
 |
|
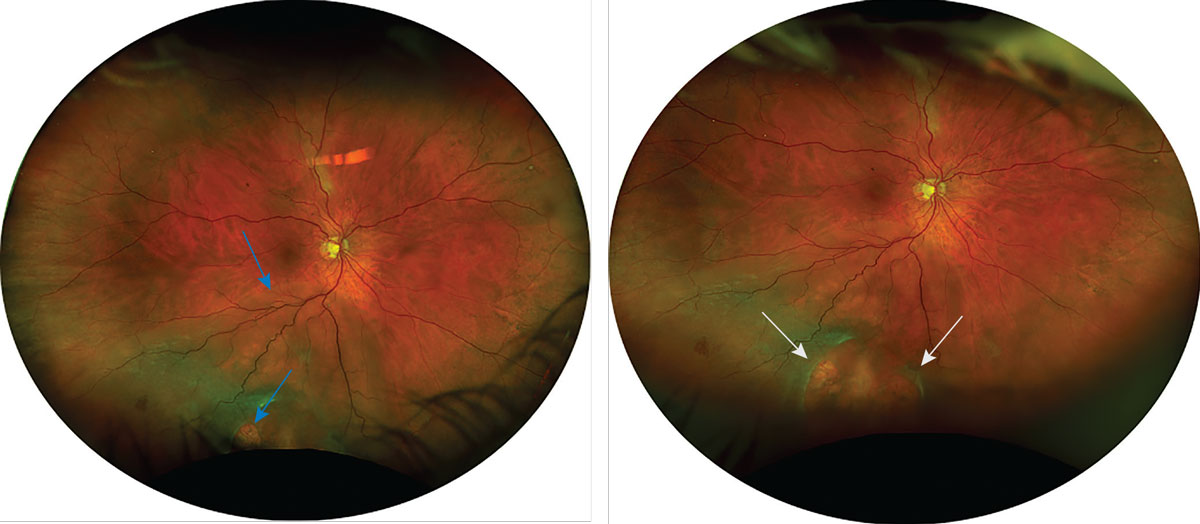
Fig. 9. This Optos photo captures a retinal detachment that could not be fully seen in Figure 7. The left photo was captured in primary gaze and shows an inferior retinal detachment with at least one retinal break (marked by blue arrows). The right photo was captured with inferior steering and shows two large retinal breaks (marked by white arrows) that could not be fully seen in primary gaze. Click image to enlarge. |
Takeaways
There are many imaging modalities to optimize peripheral retinal exams. Although widefield and ultra-widefield imaging is easier and more convenient for patients, clinicians should still advise patients on the importance of dilation for their ocular health. This is essential to make sure that retinal conditions like holes, tears, peripheral disease or detachments have not been missed by imaging due to artifact. Additionally, using steering to make the patient look into extreme fields of gaze to view the periphery when using widefield imaging will capture more retinal views. Techniques such as scleral depression, BIO and three-mirror gonioscopy are essential to view the periphery and should be practiced routinely to feel more comfortable performing them on patients. Doing so will ensure that clinicians may better diagnosis and monitor conditions within the periphery.
Dr. Njeru is a staff optometrist at the Chillicothe VA Medical Center. He graduated from Ohio State University College of Optometry and completed his ocular disease residency at the Chillicothe and Columbus VA. He is a fellow of the American Academy of Optometry. Dr. Miller is also a staff optometrist at the Chillicothe VA Medical Center. She graduated from Ohio State University College of Optometry and completed her ocular disease residency at the Chillicothe and Columbus VA. They have no financial interests to disclose.
1. Kolb H. Simple anatomy of the retina. In: The organization of the retina and visual system. Salt Lake City (UT): University of Utah Health Sciences Center. Last updated January 31, 2012. 2. Rafieetary M. Navigating the retinal periphery. Rev Optom. 2021;158(2):58-68. 3. Dinardo A, Walling P. The lost arts of optometry, part one: a refresher on scleral depression. Rev Optom. 2013;150(8):44-50. 4. Haynie JM. Can we pre-empt damage from retinal detachment? Rev Optom. 2020;157(9):72-77. 5. Gupta A, Singh P, Tripathy K. Auxiliary lenses for slit-lamp examination of the retina. In: StatPearls. Tresure Island (FL): StatPearls Publishing. Last updated August 25, 2023. 6. Patel SN, Shi A, Wibbelsman TD, Klufas MA. Ultra-widefield retinal imaging: an update on recent advances. Ther Adv Ophthalmol. 2020;12:2515841419899495. |