Optometric SurgeryThe scope of practice has expanded for optometrists in several states over the last few years to include minor ocular surgery and use of lasers. Today, 10 states allow ODs to perform these advanced procedures, which are on their way to becoming ingrained into the profession's DNA. Whether your state already has or has yet to expand its optometric practice scope, this month's issue of Review of Optometry intends to prepare ODs across the country to tackle these new opportunities when their time comes. Check out the other articles featured in the December issue:
|
Over the past several years, optometrists have continued to expand their scope of clinical responsibilities throughout many states, which has led us now to the opportunity of adding injection and incision procedures into our practices. Being a recent graduate, I was able to incorporate this service into my practice from day one. I quickly learned how beneficial it was for optometrists to have the opportunity to provide these services for patients. Lack of these types of services requires patients to travel additional miles and spend extra time seeking care elsewhere that could have been managed by their local optometrist.
This expansion has been revolutionary for many optometric offices, as it not only provides increased convenience for our patients, but more importantly, it allows for the highest level of optometric care.
Setting Up
While getting your office prepared to perform these procedures, it is vital to have specific procedure consent forms at the ready, as well as pathology vials and forms. In our office, we typically use the 10mL specimen containers. Additional needed equipment includes:
- Sterile betadine swabs
- Sterile towels
- Eye patches/pads
- 4x4” gauze pads
- 1” paper tape
- Syringes/needles (typically half inch to one inch with 25- to 27-gauge)
- Adson tissue forceps
- A scalpel (No. 3 or 4) with blades (11 or 15)
- Sharps container
- Chalazion clamps with curettes
- Westcott scissors
- Headband magnifier
- Anterior segment camera
- Local anesthetic (1% lidocaine with epinephrine 1:100,000 and 8.4% bicarb)
- 10 to 40m/mL Kenalog (triamcinolone, Bristol-Myers Squibb)
- Antibiotic ointment (my preference is erythromycin)
- High-temperature cautery device
- Autoclave with sterilization packs
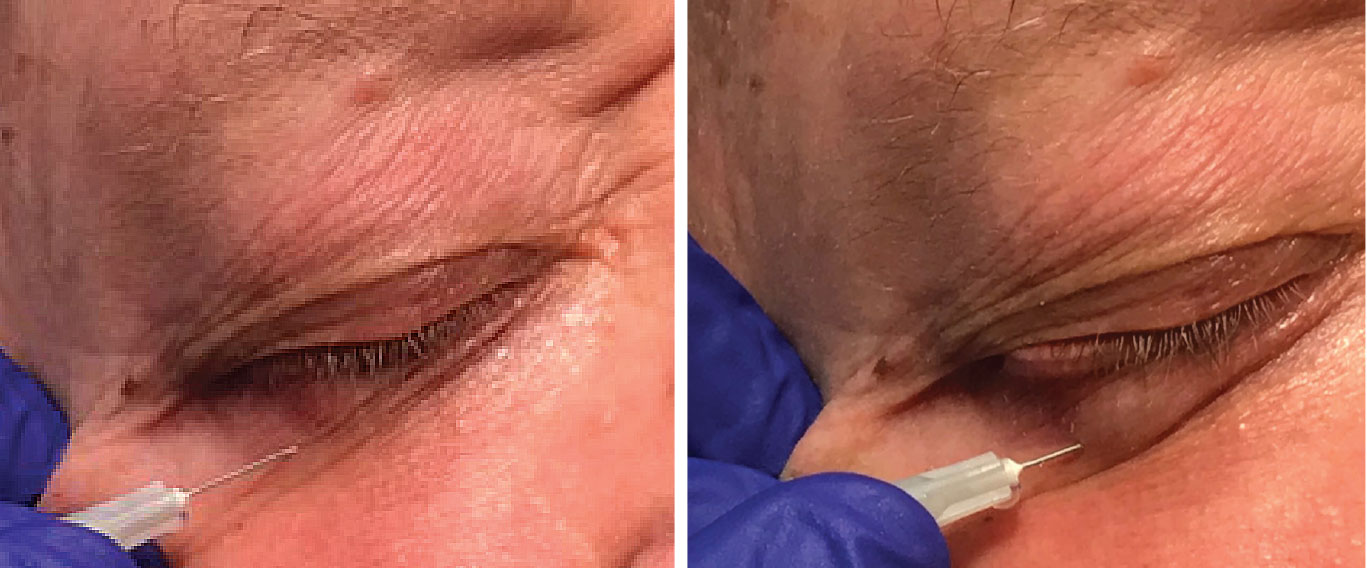 |
| In the first image (left), lidocaine is injected in the lower left eyelid. Once the anesthetic is fully injected, you can see the area under the skin where the anesthetic fluid is (right). Photo: Jackie Burress, OD, and Rodney Bendure, OD. Click image to enlarge. |
Depending on the types of lesions you are planning to remove, an electrosurgical unit could be beneficial to your practice. It is also important to have an established account with a nearby lab for biopsy testing, such as Labcorp (our office uses them), which is a free service that provides free materials for your office, along with the designated specimen containers and necessary paperwork to evaluate lesions. If a lesion is biopsied, the service charge will be billed to your patient’s insurance. As such, ensure that your patient is aware of this process. Additionally, remember to have this in consent form or another document stating that insurance will be billed in the event of a biopsy.
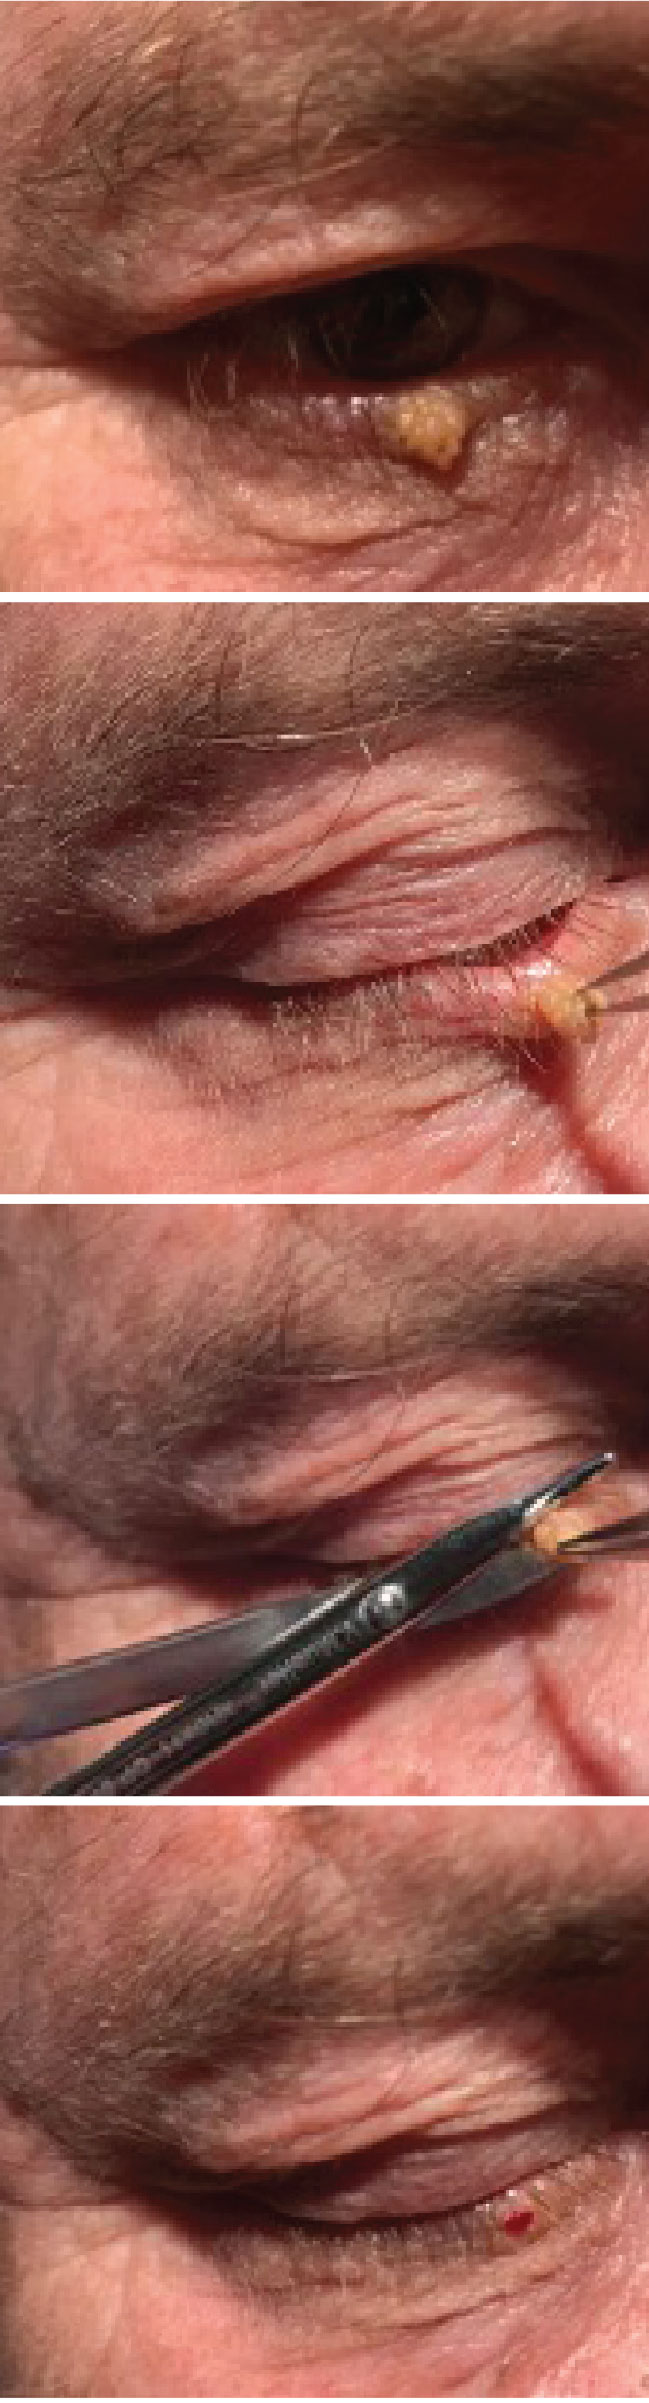 |
| A small papilloma is removed from the lower right eyelid. The forceps are used to pull the lesion taut to provide a clear sight to the base of the lesion. The Wescott scissors are used to cut the lesion at the base. Once the lesion is removed, the patient is left with a flat, smooth surface. Photo: Jackie Burress, OD, and Rodney Bendure, OD. Click image to enlarge. |
Preoperative Procedures
Initially, when I see a patient for a lesion removal, I always like to take a pre-op photo. This can be done simply with an iPhone (or another smartphone) or with a digital camera and imported into your EHR system. It is also great to hold a ruler up to the lesion to document the size. This allows for accurate documentation of the lesion for my reference and also results in instant satisfaction for the patient after comparing the pre-op and post-op photos.
Most of the lesions I find myself removing are stubborn, irrtating skin tags. These small papillomas typically make their home in the creases of the eyelids, where most patients find them, to be uncomfortable or irritating and, in some cases, unsightly. Many of these lesions, if close to the lid margin, end up in the patient’s line of sight and can be extremely aggravating. These lesions can also cause a low-grade chronic red eye due to the shedding of viral particles onto the ocular surface, which is another reason to remove them.
The size and location help me determine if a local anesthetic is necessary. I typically do not inject local anesthetic if the lesion is on a stalk and can be easily removed by clipping with surgical scissors. Instead, I will typically snip that type of lesion off without anesthetic, and the patient tolerates these procedures well. This is personal preference of mine due to the pain involved with the injection being the same, if not more, than what is endured with the removal alone.
The process of removing these starts with a sterile environment. A sterile drape should be laid out with all the potential equipment needed as well as a sterile betadine swab, sterile gloves and erythromycin ointment on the side. I tend to remove my lesions outside of the slit lamp using a headband magnifier, which allows for a much larger range of motion but with the same clarity.
Operation Technique
Begin by washing your hands thoroughly, then put on sterile gloves. Next, the sterile betadine swab is applied to the lesion and the surrounding area by starting at the lesion and circling out. Once dried, take the Adson tissue forceps to pull the lesion away from the skin, allowing for the best view of the base of the lesion. Then, take the Westcott scissors to cut the lesion at the base. If a biopsy is warranted, place the specimen in the container with the appropriate paperwork for it to be picked up by the local lab.
Usually there is very minimal bleeding involved in these procedures, and thus they require very little clean-up to the affected area. If the patient does happen to be a “bleeder,” apply a handheld cauterizer. Note that it is not necessary to discontinue a patient’s use of aspirin or any blood thinners prior to this procedure.
Lastly, apply erythromycin ointment to the affected area and prescribe the patient a 3.5g tube to use twice a day until they are seen again at their post-op. Typically this is two weeks later, but they should be seen sooner if any complications arise.
In some instances, local anesthetic is warranted during the removal either due to the size of the lesion or patient preference; if so, an intradermal injection should be performed. To begin, it is not a bad idea to mark the lesion before injection to ensure the original borders. Insert the needle laterally at five to 10 degrees with the bevel up and aspirate to ensure correct location. Inject approximately 0.3mL to 0.4mL of anesthetic, gently massage the area and wait five minutes for the medication to take effect. Afterward, proceed as discussed previously.
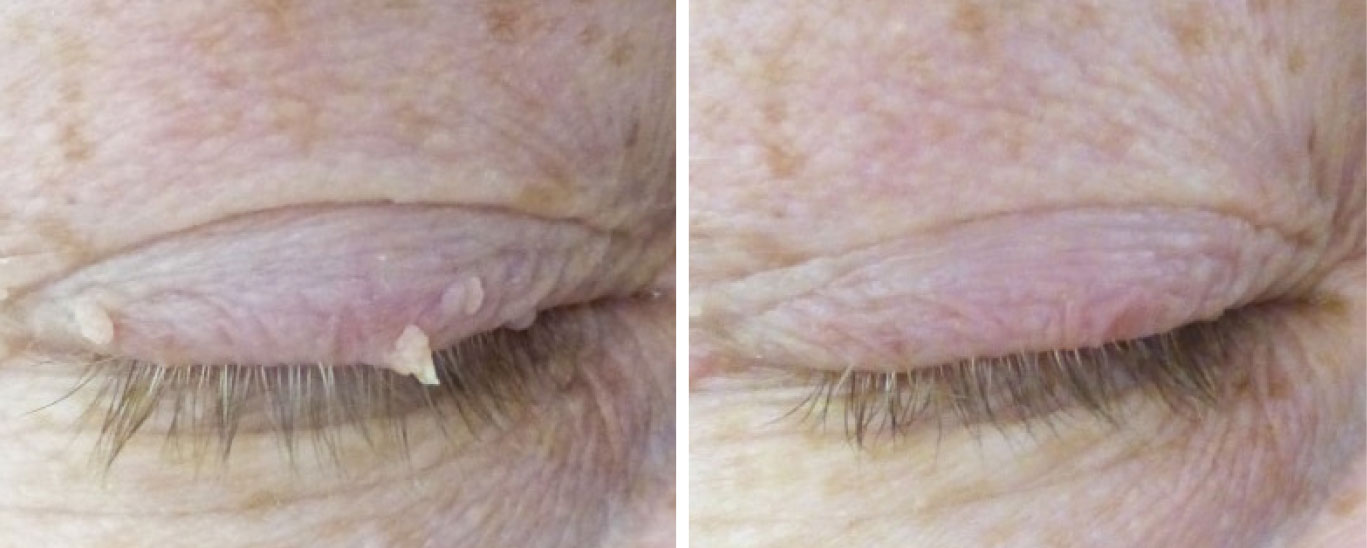 |
| Here are a few small papillomas located on the upper eyelid before and after removal. For more, visit https://skinsurgeryclinic.co.uk/treatments/skin-tag-removal. Photo: Jackie Burress, OD, and Rodney Bendure, OD. Click image to enlarge. |
Other Lesion Types
Hidrocystomas, otherwise known as sudoriferous cysts, are other lesions we remove quite often. These types can be easily lanced and drained in the office by taking a scalpel blade to open the cyst and draining the fluid while holding gauze pads to the area to help with clean-up. On some occasions, you will need to use the Westcott scissors to remove additional skin that could be present once the fluid is drained. Lastly, apply erythromycin ointment to the affected area, prescribe it twice a day and evaluate it at the post-op in two weeks.
The third most common removals are chalazia. I like to err on the side of caution with this type and ensure that the patient has been using heat masks at least twice a day for at least three months before considering removal or intralesional injections.
When determining an intralesional injection (Kenalog) vs. incision and curettage, there are a few things to consider. Skin color is a large determinant. If the patient has darker pigmented skin, Kenalog could cause lightening of the tissue, leaving the area cosmetically unappealing. Therefore, this approach is typically contraindicated in darker-pigmented patients. The steroid injection is only about 75% to 90% effective, with 25% needing a second injection, whereas incision and curettage is greater than 90% effective.
To perform the intralesional injection, create your sterile environment as discussed above, apply the betadine to the affected area and inject either externally or internally. External injection will require you to inject tangentially to the globe, while internal will require a clamp to evert the lid to inject. You will be injecting 0.2cc to 0.4cc of 10 to 20mg/mL, applying gentle pressure directly after and prescribing erythromycin ointment twice a day for one week. Incision and curettage require a clamp to evert the lid, a scalpel to create a vertical incision (allow 2mm to 3mm away from the lid) and a curette to remove the internal contents.
Lastly, forceps and Westcott scissors will be used to remove the fibrotic capsule to ensure it does not return. Once again, apply gentle pressure and prescribe erythromycin ointment twice a day for one week.
The ABCDE's OF SKIN LESION ASSESSMENTA—Asymmetry. Is the lesion asymmetrical? B—Borders. Are there blurred or irregular borders? C—Color. Is there more than one color present? D—Diameter. Is it larger than a pencil eraser? (about 6mm) E—Evolution. Has it changed over time? |
Operation Considerations
As you navigate into this new extension of care, remember to evaluate the lesion very carefully before you decide to cut into it. Always resort back to the ABCDE rule (see box below) for lesion assessment; this is vital in ensuring that you are comfortable with removing the lesion for biopsy vs. sending it out for a second opinion. Performing a biopsy on every lesion you remove is recommended, as it ensures you are ruling out any cancerous possibilities.
As with anything, there are absolute don’ts to keep in the back of your mind. Do not inject Kenalog into darker pigmented patients, as mentioned above, due to lightening of the skin. Do not use the Ellman on patients with any electronic implanted devices. This includes—but is not limited to—pacemakers, implantable cardioverter-defibrillators and cardiac resynchronization therapy. It is also important to remember that if you plan to biopsy a small lesion, don’t use the Ellman to remove it. The lab is not able to perform a biopsy on tissue that has been cauterized. You can, however, remove the lesion using scissors or a scalpel to send to biopsy and then clean up the area with the Ellman to ensure a good cosmetic outcome if the lesion is large. Finally, it is critical to not inject or cut into any lesion with suspicion of cancer.
Expanding Your Practice
When integrating these new services, ODs may face some challenges. Initially, there will be a large start-up fee involved due to the expenses for all the equipment and tools. The ongoing cost after everything is set up, though, is minimal.
Not having a large enough patient base may present another challenge. If you are in a single-doctor practice, it might be beneficial to recruit or pursue other doctors for referrals. Initially, billing insurances might be difficult because some companies do not initially recognize our scope, so reimbursements might take time to get straightened out.
Expanding your office services not only allows you as a provider to thrive in your business, but it allows us as a profession to service a larger population of patients while providing more convenience. Having patient access to multiple services in their community decreases time and money spent traveling to seek those needs elsewhere.
Takeaways
In Kentucky, since the scope of practice legislation passed in 2011, we’ve been able to provide the most efficient care to our patients in rural areas, which in turn decreases the patient’s travel time and money spent seeking care. It has also allowed us to open other revenue streams, which is highly important for our business owners. It’s no secret that eye examination reimbursements have been on a downhill slope. Incorporating this expansion into practices has subsequently allowed many practitioners somewhat of a replacement for that loss of income.
I have personally learned a lot throughout the process of offering incisions/injections in our office. One of the most beneficial concepts we added was having our local lab scheduled for pick-up and evaluation of the lesions that are sent for biopsies, which creates a quick turnaround. I also felt it was advantageous to seek out referrals from other doctors who had patients with bothersome eyelid lesions.
As with any skill, confidence comes in time through experience. Being a young doctor, a lot of the time I feel as I’m not seen as experienced, and this has been an opportunity to show my capabilities to my patients. It also serves as a great way to gain and grow the patient’s trust.
If you’re considering expanding your services, my advice is to do it as soon as possible. Our profession has fought to expand our scope, so get out there and seize the opportunities given to us! Remember, our ultimate goal is to give the best, most efficient care to our patients. By integrating this in your practice, you will provide top-tier optometric care and be able to continue to service your patients with the level of attention and convenience they deserve.
Dr. Collins received her undergraduate degree from Georgetown College in 2015 and graduated with honors as a Doctor of Optometry from The Kentucky College Of Optometry in 2020. She has practiced at The Eye Care Center since 2020 and is a member of the American Optometric Association and the Kentucky Optometric Association. During her time as an optometric extern, she spent time caring for patients at the Franklin R. Sousley VA Hospital in Lexington, KY.