44th Annual Contact Lens ReportCheck out the other feature articles in this month's report:- The Building Blocks for a Specialty Contact Lens Practice - Are You Making the Most of the New Soft Lenses? - Add Multifocals to Your Myopia Toolbox |
It’s no secret that scleral lenses single-handedly revived and now dominate the gas permeable (GP) contact lens market. Some practitioners jumped on the scleral lens bandwagon 10 to 15 years ago, while others are just now starting to get their feet wet.
This article, geared toward novice fitters, outlines how to begin providing scleral lens care for appropriate patients.
Stocking Equipment
After you’ve decided to take the plunge, you’ll need to equip your office for scleral lens fitting. There are a few items you should have handy:
Fitting sets. Start by considering the types of patients in your clinic who might need scleral lenses. Then, do your research and speak with lab consultants and colleagues about which lens designs and fitting sets best fit your practice profile.
Most scleral lens experts suggest having at least two fitting sets in your office so you can accommodate the majority of patients who walk through your door. These sets should cover a range of lens parameters and shapes, such as 15mm to 18mm diameters in prolate and oblate designs.
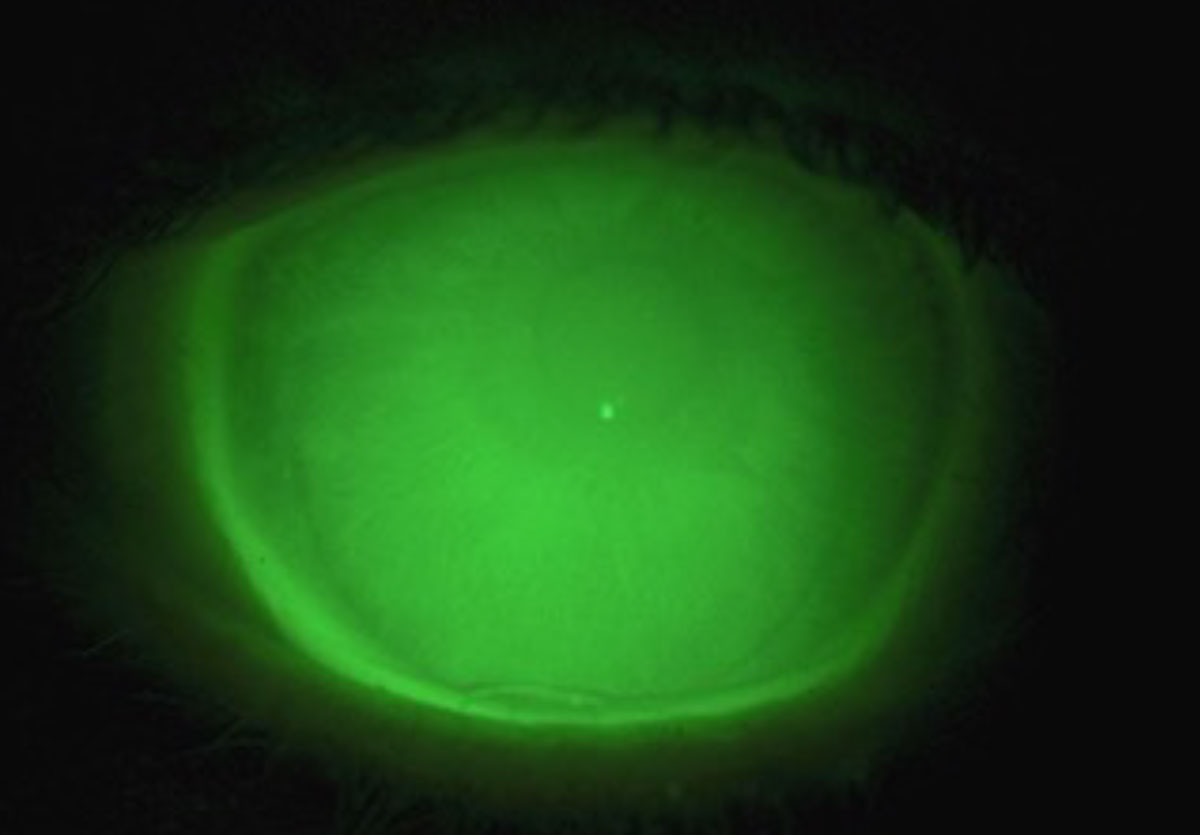 |
| Fig. 1. Observe the sheen of NaFl across the limbus to ensure proper clearance. Click image to enlarge. |
Handling tools. Stock up on plungers, which are tools used to handle lenses. A larger plunger is used to insert scleral lenses and acts like a golf tee to balance the lens as it is applied to the eye. Smaller plungers adhere to the surface of the lens for easy removal.
You can find insertion and removal educational videos at www.sclerallens.org, a site that is supported by the Scleral Lens Education Society.
Have a few mirrors to help patients learn how to apply the lenses.
Lens solutions. Scleral lenses are comprised of a GP material, but because they typically have a high Dk/t, they must be handled accordingly.
Disinfecting solutions should be non-abrasive, as the higher the Dk/t, the easier it is to cause scratches or micro-abrasions to the lens surface. Imperfections on the surface of the lens are ideal places for deposits to attach and contribute to additional glare and starburst issues.1
Prior to insertion, the lens is filled with a preservative-free saline solution. There are a number of FDA-approved and off-label filling solutions available. Make specific product recommendations and periodically confirm which products your patients are using. Due to the preservative-free nature of filling solutions, recommending products packaged in a vial is the safest approach.
Determining Candidacy
The first step in prescribing scleral lenses is understanding who benefits from them. These patients commonly have irregular corneas, ocular surface disease or both.2
Those with irregular corneas benefit from the surface of a GP lens and its ability to correct irregular astigmatism. They may have keratoconus, a post-surgical cornea—including corneal transplantation—or corneal scarring. If a patient could optically benefit from a corneal GP lens, it’s likely they are a good candidate for scleral lenses.
Sclerals are also ideal for patients who could not adapt to corneal GP lenses due to vision or comfort issues.
Patients with ocular surface disease benefit from the fluid reservoir located against the cornea in scleral lenses—the post-lens tear layer. This reservoir (filled with preservative-free saline solution, artificial tears or even autologous serum) bathes the cornea and better protects it to allow healing, promote comfort and reduce pain.
Other scleral lens candidates may include patients with lens dryness or a regular cornea shape who struggle to achieve adequate vision with other lens options, including those with high ametropia or astigmatism.2
The stability of a well-designed large lens offers a consistent visual experience that is ideal for active patients who need sharp acuity at all times.
Evaluation Process
As with any new patient, obtain a detailed medical and family history, with a focus on ocular history. Ask the patient if they have had any previous contact lens experience, either positive or negative, and if they are able to successfully wear glasses (in cases of irregular corneas).
Next comes basic entrance testing, including refraction, biomicroscopy, posterior segment evaluation and binocular vision assessment. Complete refractions to measure best-corrected acuity, even in cases of advanced corneal irregularity, for long-term monitoring purposes and to justify the need for custom contact lenses to insurance panels. Corneal topography will shed light on a patient’s ocular surface profile.
In addition to conducting a typical slit lamp evaluation, note fine ocular surface details and irregularities, including conjunctival pingueculae, melanosis and irregular vessel appearance. Record corneal findings, such as neovascularization, haze and scars, with measurements or photos for continued monitoring after initiating lens wear.
Make sure to determine the visual impact of any lenticular opacities and retinal or optic nerve disease. If a cataract is present, consider referring the patient for surgical intervention first to remove the cataract, reduce the amount of spherical refractive error and improve vision with contact lenses. It can be frustrating for both the patient and the practitioner when vision is still limited by a cataract after completing a scleral fitting.
At this time, enough information should have been collected for the prescriber to determine the patient’s candidacy for scleral lenses.
If you are still unsure whether the patient could benefit from scleral lenses due to a significant corneal scar, cataract or other concern, place a diagnostic scleral lens on one eye and perform retinoscopy to evaluate vision potential. This is also a great way to judge the potential for relief in the case of ocular surface disease.
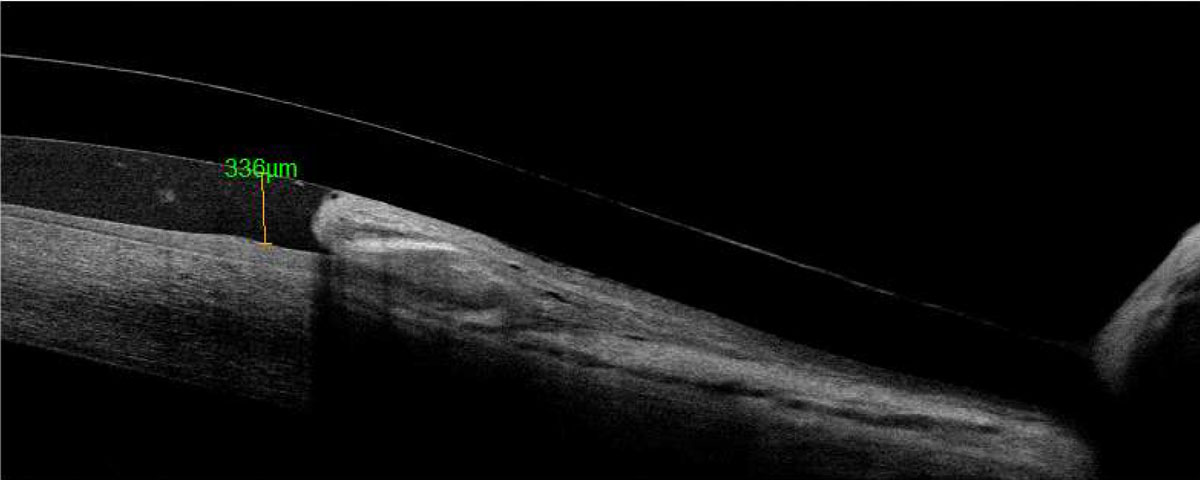 |
| Fig. 2. Anterior segment OCT of the limbal area shows conjunctival prolapse. Click image to enlarge. |
Patient Education
When a candidate for scleral lenses presents in your office, it’s important to take a consistent step-by-step approach, especially as your practice relies on you evaluating, educating and fitting every patient according to policy. Not only does this promote professionalism within the field, but it also creates a foundation for growth.
Since there is so much information available on scleral lenses, taking the time to cover several key points with patients right away can save time and money later in the process. These patients typically respond better to transparency and are more compliant.
Consider putting together a contract-like form of all the information you cover that requires your patient’s signature after they have been evaluated but before you pursue further action. This protects your office by limiting the services that a patient may have otherwise declined. Think about having a qualified staff member present the contract and answer any questions, as this discussion can be time-consuming.
Include the following in the patient education part of the process:
- Lens costs and warranty period
- Service fees and insurance coverage
- Payment timing and refund policy
- Care products and wearing/replacement schedule
- Follow-up commitment and troubleshooting
Lens Selection
Once the patient reviews and signs the form, the fitting process can begin. From the diagnostic set, select the lens according to the corresponding fitting guide. While scleral lens diagnostic sets are all slightly different, these general aspects can help with your initial selection:
Lens diameter. Larger corneas need larger lens diameters to appropriately vault the limbus. A larger lens diameter (at least 16.5mm) should also be used for very severe ocular surface disease to ensure more surface coverage. Smaller lenses (15.0mm to 16.0mm) can be used for patients with regular corneas and milder dryness.
Lab consultants can help you select diagnostic sets with appropriate corresponding diameters and, from there, fine-tune measurements.
Corneal shape. Regular and ectatic corneas typically require a prolate lens shape that is steepest in the center and flatter toward the periphery. Post-surgical corneas are flatter centrally and steeper in the mid-periphery. This oblate shape is seen with post-LASIK, post-radial keratotomy, corneal transplants and Intacs (AJL Ophthalmics) rings in some cases of keratoconus.
Some scleral lens diagnostic sets have both oblate and prolate lens shapes to better align with the corneal shape and aid in centration.
Sagittal depth. More severe ectatic conditions require deeper lenses, while regular corneas are typically shallower.
When selecting your first diagnostic lens, start with a shallower sagittal depth for normal-shaped eyes, and move to a deeper sagittal depth for severe ectasia requiring a larger lens.
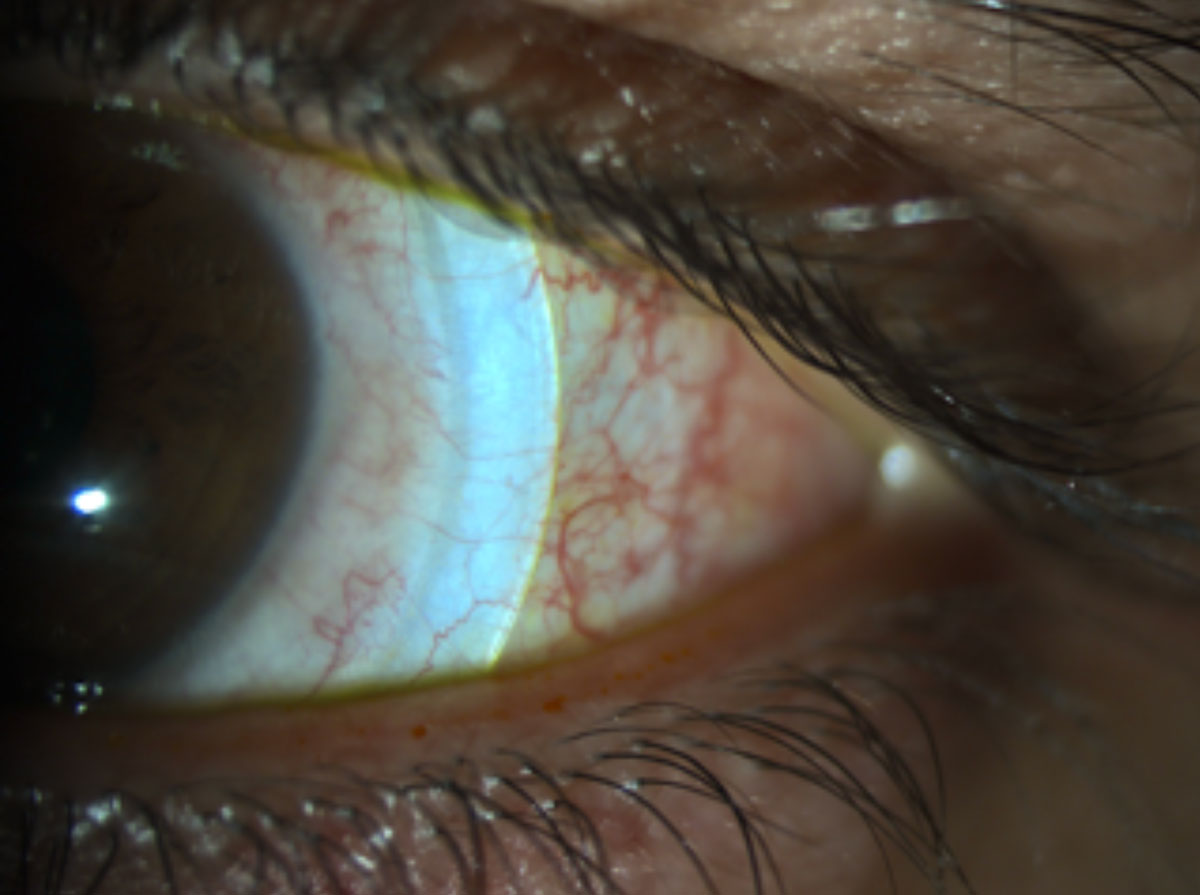 |
| Fig. 3. Blanching occurs under the peripheral curves and can cause limbal vessel engorgement. Click image to enlarge. |
Dispense Visit
This is an exciting day for both the patient and the practitioner. The scleral lenses should be prepared for wear according to lab instructions. Some lenses come ready to wear, while others arrive dry and need to be cleaned and conditioned.
Have a dispense kit for the patient ready that includes recommended cleaning, storing and filling solutions, along with a few plungers. Also, provide a form that lists the recommended solutions and how to use them, websites for insertion and removal help and the expiration date on the specialty lens warranty. Patients are given a lot of information at the dispense visit, so it’s easy for them to get confused or forget instructions. This form will ensure that doesn’t happen.
When the patient arrives, briefly review their history and check their acuities and corneal health to ensure it’s safe to insert the lenses.
After the lenses have been placed, use the same evaluation and over-refraction technique as with the diagnostic lenses. Follow with insertion and removal training, and dispense the lenses if the fit and vision are adequate.
Adjusted lenses can be ordered with the lab consultants. If no reorder is needed, the patient can return in about seven to 10 days for a follow-up corneal and lens evaluation.
Follow-ups and Troubleshooting
As you follow your patient through the warranty period, changes to the lens fit will need to be made. Follow-up visits can be a challenge to a new scleral lens fitter because patients usually present with the lenses on, and the practitioner must evaluate them without using NaFl. With practice, you’ll become comfortable evaluating the central vault without the use of dye.
Evaluation of the limbal area can be more difficult without NaFl dye; this is where using AS-OCT can be valuable.
Another useful tool for troubleshooting is an anterior segment camera on the slit lamp that can take photos and videos for a consultant to review and suggest changes.
Ferris State University’s scleral lens fitting guide can also come in handy.5
Once the prescribing process is complete, follow-ups are based on the corneal condition of the patient and the comfort level of the practitioner.
Delicate corneas prone to damage, neovascularization or inflammation should be seen several times per year to monitor corneal health; whereas, corneas that are less likely to have an adverse reaction to a scleral lens can be seen less often, perhaps every six months.
Mastering the art of scleral lens fitting presents a personal and professional commitment. However, the benefits are certainly worth it.
The information presented in this article is just the tip of the iceberg, but there are plenty of resources readily available for you to learn more.
Dr. Messer received her doctor of optometry degree and completed a cornea and contact lens residency at the Southern California College of Optometry. She now practices in Edina, MN, with special interests in scleral, multifocal and orthokeratology contact lenses.
1. DeNaeyer GW. The scleral lens vault. Contact Lens Spectrum. 2018;33:42. 2. Nau CB, Harthan J, Shorter E, et al. Demographic characteristics and prescribing patterns of scleral lens fitters: the SCOPE Study. Eye Contact Lens. 2018;44(Suppl 1):S265-72. 3. Jedlicka J. Critical measurements to improve scleral lens fitting. RCCL. 2015;152(6):26-31. 4. Caroline PJ, André MP. Scleral lens settling. Contact Lens Spectrum. 2012;27:56. 5. Ferris State University. Scleral lens fit scales. www.ferris.edu/optometry/vision-research-institute/pdfs-docs/Scleral-lens-fit-scales_v2.pdf. July 9, 2020. |
