Making the DiagnosisExplore these other articles featured in our 9th Annual Diagnostic Skills & Techniques Issue.
|

We often see our student clinicians and residents become nervous when performing gonioscopy, but it is not just those fresh learners who need the help and practice with anterior segment assessment and analysis.
Gonioscopy is an important ocular health assessment that takes less than two minutes to perform and provides a tremendous amount of t information.
Yet, many doctors in workshops we lead seldom perform gonioscopy.1 Why? Likely because they never really became confident in performing it and have now avoided it for so long that they have lost this clinical skill. But have no fear: with practice, gonioscopy will become a quick and valuable tool.
Tendency to Overlook
Gonioscopy is the process of assessing the anterior chamber in order to diagnose abnormalities of the intraocular drainage system. The globe produces and drains aqueous humor constantly. If the angle is narrow or closed, the drainage of the fluid would be obstructed, potentially causing an elevated intraocular pressure (IOP). Gonioscopy is the gold standard for diagnosing angle closure, is important in detecting signs of secondary glaucoma and provides an evaluation of the angle anatomy including iris configuration, the presence of peripheral anterior synechiae, pseudoexfoliation, pigmentation within the trabecular meshwork, neovascularization, tumors and angle recession.2
 |
|
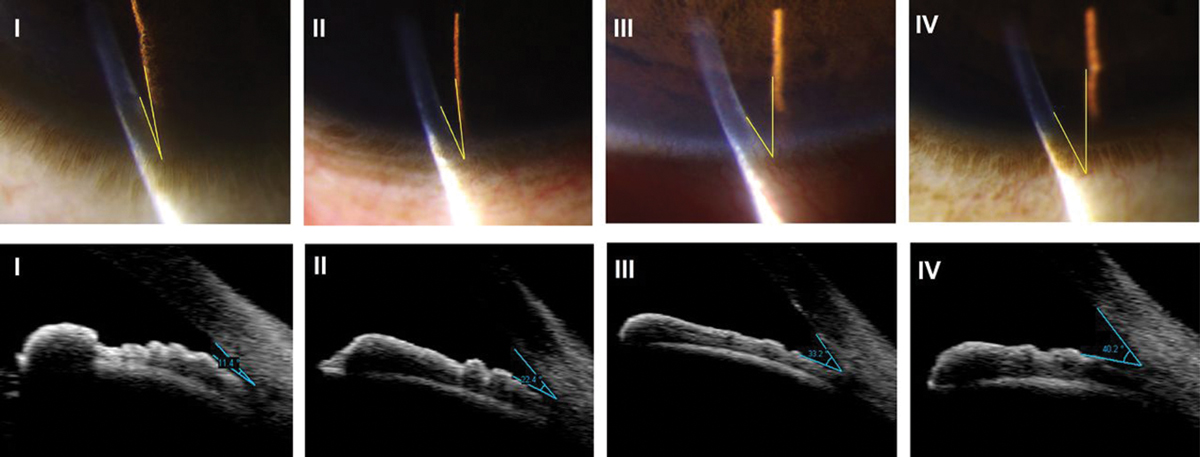
An assessment of the anterior chamber depth using the Van Herick method and grading system. This is a quick screening method to estimate anterior chamber depth. Click image to enlarge. |
Unfortunately, gonioscopy is not being performed as often as it should be by doctors clinically. Gonioscopy needs to be performed on patients who have suspected angle narrowing or patients with a history of increased IOP, retinal vein occlusion, proliferative diabetic retinopathy, ocular ischemic events or ocular trauma. Performing gonioscopy on all your glaucoma patients will not only allow you to properly classify the type of glaucoma but also to continue to practice and become much more confident identifying angle structures and pathology.
Clinicians often train their technicians to assess the anterior chamber using the Van Herick grading technique. Van Herick assessment uses a thin slit lamp beam at the peripheral edge of the cornea, angled at least 60º. You then compare the width of the corneal cross-section with the gap between the posterior cornea and the illumination on the iris to estimate depth. Any anterior chamber with a grade II or shallower by Van Herick must be fully assessed using gonioscopy.
However, studies have shown the Van Herick method has low accuracy in properly identifying narrow angles.3,4 Without performing gonioscopy, many narrow angles are not being identified. Therefore, periodic gonioscopy reevaluation is necessary, as patients who appeared to have an open angle in the past can go on to develop angle-closure.
Anterior segment optical coherence tomography (AS-OCT) can be helpful for patients with cloudy corneas or who are unable to tolerate the procedure, but current AS-OCT technology is expensive, only measures a small fraction of the angle, can be disruptive to clinic flow and does not have a high enough specificity to be used as a general screening tool.5
AS-OCT is a great tool for quantitatively assessing the angle in scotopic vs. photopic situations. Though this can be done with gonioscopy subjectively, the objective nature of the OCT measurements are more accurate.
Gonioscopy remains the gold standard for angle assessment given the access to lenses vs. machines, as well as the ability to assess the angle 360º vs. small cross-sections on OCT, which does not depict the full picture.
Mirrors and Lenses
There are many types of gonioscopy lenses to view the angle, and each is beneficial in different situations.
Three-mirror lenses provide the best view of the angle but require a coupling solution. With using a larger diameter lens such as the three-mirror, using a coupling solution allows for fewer air bubbles in your view, as well as the suction of the lens to the cornea. Three-mirror lenses contain a central fundus lens, a thumbnail mirror (59º) for viewing the angle and ora serrata, a rectangular mirror (67º) for viewing the equator to ora and a trapezoid mirror (73º) for viewing the posterior pole to equator. You must rotate the lens 360º to view the entire angle.
The smallest and steepest mirror is used for gonioscopy, while the other two mirrors and the central lens are used for evaluation of the retina. This makes the three-mirror lens a particularly valuable multipurpose tool. Because of its outstanding optics and ease of handling, this lens is particularly useful for beginners.
Small lenses without a flange—most commonly four-mirror lenses—are more difficult to master, as the lens does not tightly affix to the anterior surface. But once you do master the technique, four-mirror lenses are faster and do not require a coupling solution.
Small lenses also have the unique benefit of being able to perform dynamic gonioscopy‚ a technique in which the lens can be used to compress the cornea and the anterior chamber to assess if the chamber is anatomically closed vs. if there is peripheral anterior synechiae. Pushing in the cornea to make a few folds will push anterior chamber aqueous through the chamber. If the angle is narrow or closed with compression, the angle will widen; however, with synechial closure or with a plateau iris, the angle will stay the same depth.
There are also four-mirror lenses available with a flange, which combines the strengths of both the three-mirror and four-mirror lenses. Since there are four lenses for viewing the angle, the lens only needs to be rotated 11º to complete the 360º view.6
 |
|
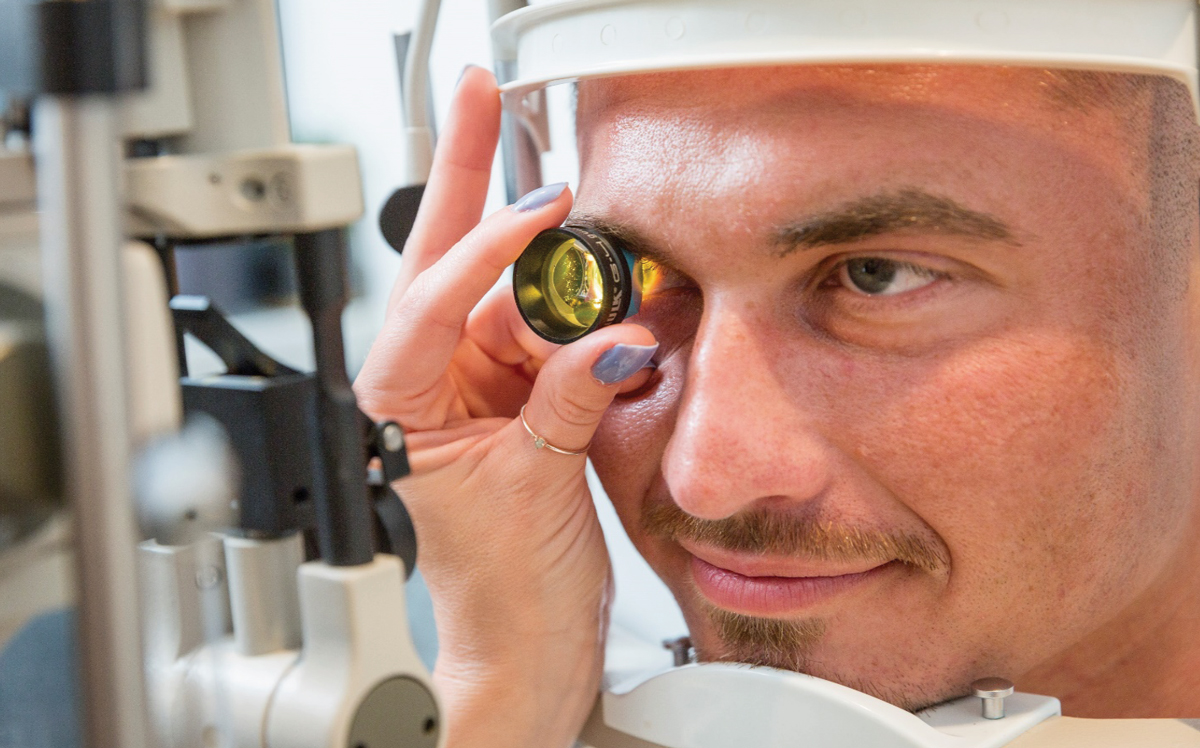
Properly positioning the patient is key for successful application and assessment. Ensure the patient is centered, lateral canthus aligned and their chin and forehead are always firmly pressed against the slit lamp. Click image to enlarge. |
Application and Technique
Ideally, gonioscopy should be performed on an undilated patient, in a room with dimmed light, using low slit lamp illumination. Physiologic pupil constriction due to light levels can artificially open the angle, thus overestimating the natural depth of the anterior chamber. Set your slit lamp initially at low magnification to better orient yourself within the lens. Once you have prepared your lens, adding coupling solution as necessary, instill topical anesthetic to both eyes of the patient.
Make sure to position the patient in the slit lamp as comfortably as possible. This will help to ensure the patient does not move during the examination. The patient’s lateral canthus should line up with the canthal marking line on the slit lamp to allow enough vertical movement of the slit lamp joystick so the patient and the clinician do not have to move once the lens is placed. Explain to the patient that the lens will come very close to the eye but it will not hurt. Brushing their eyelashes lightly with the lens will minimize the patient’s surprise and impulse to pull away. Once you have inspected the corneal integrity and the patient’s anterior surface is numb, you are ready to start.
Whether using a three-mirror or four-mirror indirect lens, have the patient look up and set the inferior edge of the lens on the bulbar conjunctiva. This will ensure that the lower lid is blocked from pushing the lens up. Have the patient look straight ahead while rocking and centering the lens on the corneal surface. You may need to use the other hand to move the upper eyelid up out of the way of the lens. Ideally, the lens is held inferiorly by the thumb and superiorly with the middle finger, allowing for the index finger to be free to rotate the lens as needed and your other hand to maneuver the joystick. The ring and pinky fingers thus can rest on the patient’s cheek or forehead strap for stability during the exam. The clinician may need support under their elbow, which will aid in stability of the lens and comfort and stamina of the doctor.
Once the lens is in place, it is best practice to begin by assessing the inferior angle. Remember you are viewing the opposite quadrant, so the angle mirror to begin with will be the superior mirror. The inferior angle is often open the widest and has the most pigment. This will allow you the best opportunity to become orientated and identify the structures visible. For the inferior and superior angles, the beam should be a narrow vertical beam, and the beam should be switched to horizontal when assessing the nasal and temporal quadrants.
To remove a flanged lens, have the patient look nasally and squeeze their lids to loosen the suction between the cornea and gonioscopy lens. Be cautious to not pull the lens away swiftly, as this can increase the risk of corneal irritation or abrasions, particularly in patients with epithelial basement membrane corneal dystrophy.
 |
|
Gonioscopy reveals peripheral anterior synechia. Click image to enlarge. |
Anatomy: Angle Structures
Once the gonioscopy lens is on the cornea, the next step is to assess what you see in your views. The key is to know what normal angular anatomy looks like; that way clinicians know when they are viewing a narrow angle or an angle with pathology. The first step is to identify the iris, the largest and most posterior portion of the angle. After the iris root the order of structures is as follows (posterior to anterior): ciliary body (CB), scleral spur (SS), pigmented trabecular meshwork (TM), non-pigmented anterior TM and Schwalbe’s line (SL).
The CB is made up of the ciliary muscle and the ciliary epithelium. The ciliary epithelium is responsible for production of the aqueous humor which is secreted into the posterior chamber of the globe. The ciliary muscle is responsible for controlling the zonular fibers, which adjust the lens for accommodation needs.
It is often the easiest to identify the SS, a thin pale line, which can yellow with age, between the ciliary body and pigmented TM. It is the site of attachment for the longitudinal muscle of the CB (pulls on the spur and opens the TM). If the clinician identifies the SS, they know it is a wide-open anterior chamber. This is easier to note in patients with darker irises, as the pigment helps delineate the anatomical bands.
The TM is responsible for draining 60% to 95% of the aqueous humor.1,6 The anterior meshwork is usually non-pigmented, while the posterior meshwork becomes more pigmented over time (more flow through the posterior TM).
Thus, in patients with light irises, viewing and identifying these structures can be increasingly difficult as the lack of pigment can make it seem as though all the structures look the same; conversely, heavy pigmented angles can also be difficult to distinguish. This is where the corneal wedge technique can help orient you within the angle.
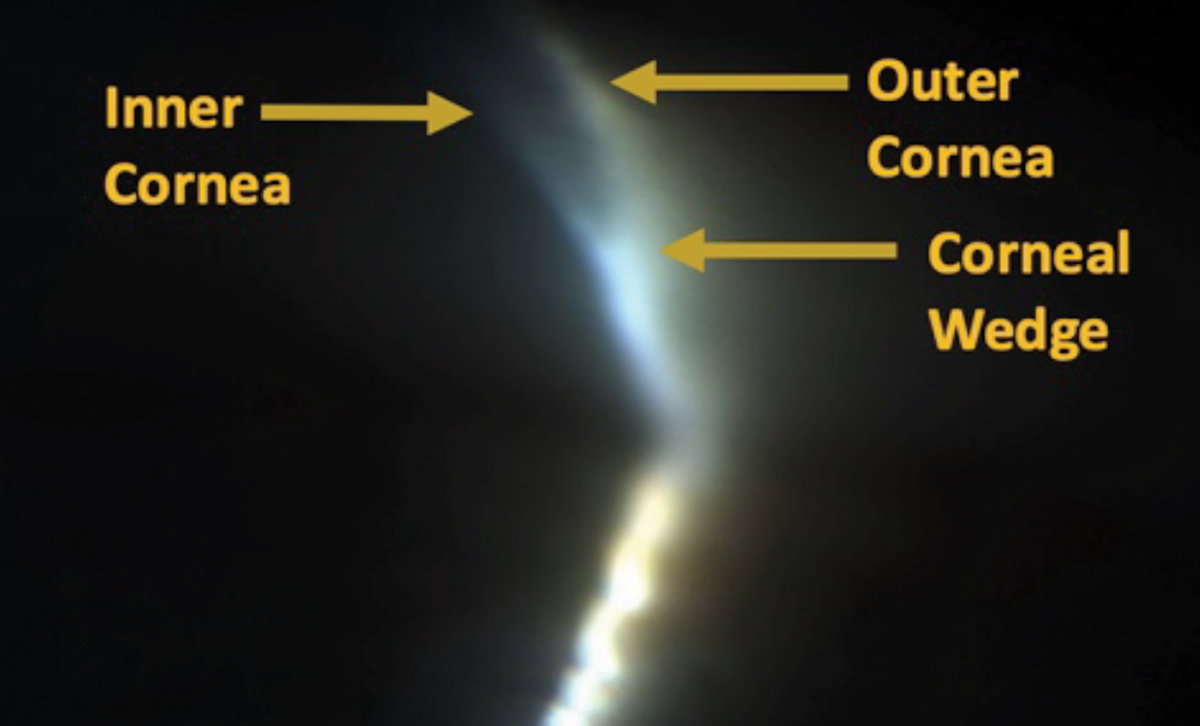
The corneal wedge technique allows for detection of the anterior edge of the TM by highlighting the SL, the most anterior structure of the angle. Set up the slit lamp to have a thin beam. With the oculars centered, adjust the light beam 15º to 20 º off-center. This movement will form two beams of light: a brighter beam that follows the iris through the angle and onto the internal corneal surface, and the second broader and fuzzier beam that follows the external corneal surface as it meets the sclera. The apex of where the two beams meet is at the SL.
Being able to detect the most anterior surface can then allow the clinician to assess the more posterior angle structures confidently. In addition to evaluating how open the angle is, the clinician also needs to view and judge the configuration of the iris. The iris itself can be configured as flat, concave or convex.1,6
 |
|
Slit lamp image of a corneal wedge through gonioscopy helps identify the anterior most portion of the angle. Click image to enlarge. |
Grading
There are three common gonioscopy grading systems used to document what is seen clinically. Comparing these are important to assess changes over time. If the clinician chooses not to use one of these grading systems, they must record, at minimum, the posterior structure seen, amount of angle pigmentation and iris configuration.
It is imperative that you document which grading system you are using when recording gonioscopy angles serially in patients’ charts, as each grading system has a different terminology of angle structures seen.
Shaffer system. This asks how open is the angle? It estimates the angle between the iris and TM. A larger number notes a wide-open angle:
- 4=45º to 35º
- 3=35º to 20º
- 2=20º
- 1=≤10º
- Slit
- 0=closed
Spaeth system. This describes four aspects of the anatomy of the angle.
1. Level of iris insertion
- A=anterior to SL
- B=SL to SS (in area of TM)
- C=posterior to scleral spur
- D=deep into CB face (visible band of anterior CB)
- E=extremely deep (wide band of CB visible)
2. Width of angle
- Angle made by line tangential to iris and line tangential to face of the TM
- 0º to 40º
3. Configuration of iris
- s=steep or convex
- r=regular or flat
- q=queer or concave
4. Angle pigmentation; graded on a zero to four scale
Scheie system. In contrast to the Shaffer and Spaeth grading scaled, the Scheie grades in a way that looks at how closed the angle appears. It uses Roman numerals to describe the degree of angle closure and pigmentation. The larger number notes a narrower angle or heavier pigmentation.1
- 0=entire angle visible with wide ciliary body band
- I=iris obscures part of CB
- II=nothing posterior to TM visible
- III=posterior TM not visible
- IV=no structures posterior to SL visible
Angle pigmentation is graded from 0 (no pigmentation) to IV (heavy pigmentation).
Keep Practicing
The key to mastering gonioscopy is multilayered but easily achievable. Remember that primary open angle glaucoma cannot be diagnosed without angle assessment. Far too often patients are misdiagnosed as open angle when they are on the angle-closure spectrum. Performing gonioscopy will identify if the patient must be referred for a laser procedure to assist in increasing the depth of the anterior chamber.
The first step, and often the scariest, is properly and confidently applying the lens. This is the step that often needs the most practice before it becomes second nature. The more you do it, the easier it will become and the more accurate you will be at distinguishing a normal vs. pathological angle.
Not having these skills can be costly to your practice. By not performing gonioscopy, you are losing billable procedures for your office, and if you repeatedly must refer out these patients for a simple gonioscopy procedure, you could lose them to another provider for good.
Dr. Herbert and Dr. Thompson practice at the Cincinnati VA Medical Center. Dr. Rose owns and practices at Eyecare on the Square in Mariemont, OH. They are Fellows of the American Academy of Optometry. They have no financial disclosures.
1. Hertzog LH, Albrecht KG, LaBree L, Lee PP. Glaucoma care and conformance with preferred practice patterns. examination of the private, community-based ophthalmologist. Ophthalmology. 1996;103(7):1009-13. 2. Dada T, Sharma R, Sobti A. Gonioscopy: a text and atlas (with goniovideos). Jaypee Brothers Medical Pub; 2013. 3. Kim JM, Park KH, Han SY, et al. Changes in intraocular pressure after pharmacologic pupil dilation. BMC Ophthalmol. 2012;12:53. 4. Thomas R, George T, Braganza A, Muliyil J. The flashlight test and van Herick’s test are poor predictors for occludable angles. Aust N Z J Ophthalmol. 1996;24(3):251-6. 5. Radhakrishnan S. Diagnosing angle closure: gonioscopy vs. OCT. Rev Ophthlamol. 2019;25(4):60-4. 6. Johnson TV, Ramulu PY, Quigley HA, Singman EL. Low sensitivity of the Van Herick method for detecting gonioscopic angle closure independent of observer expertise. Am J Ophthalmol. 2018;195:63-71. |
