Bright Ideas for Better ExamsThe February 2023 issue of Review of Optometry is our annual diagnostic skills and techniques issue. In each article, eyecare experts offer practical tips and advice to help you brush up on exam techniques that you can put to use everyday in your office. Check out the other articles featured in this issue:
|
No matter how long we’ve been in practice, we always have more to learn—the art of practicing optometry is just that. We can continue to pick up little nuggets as we go, and sometimes spending time talking to other ODs to glean these gems is all it takes.
The tips offered here will improve your exam techniques in the clinic with regular ol’ equipment, and range from somewhat technical to ridiculously practical. While some may make you say “duh,” hopefully at least one or two will be worthwhile and help you become a more savvy diagnostician.
Slit Lamp Tips
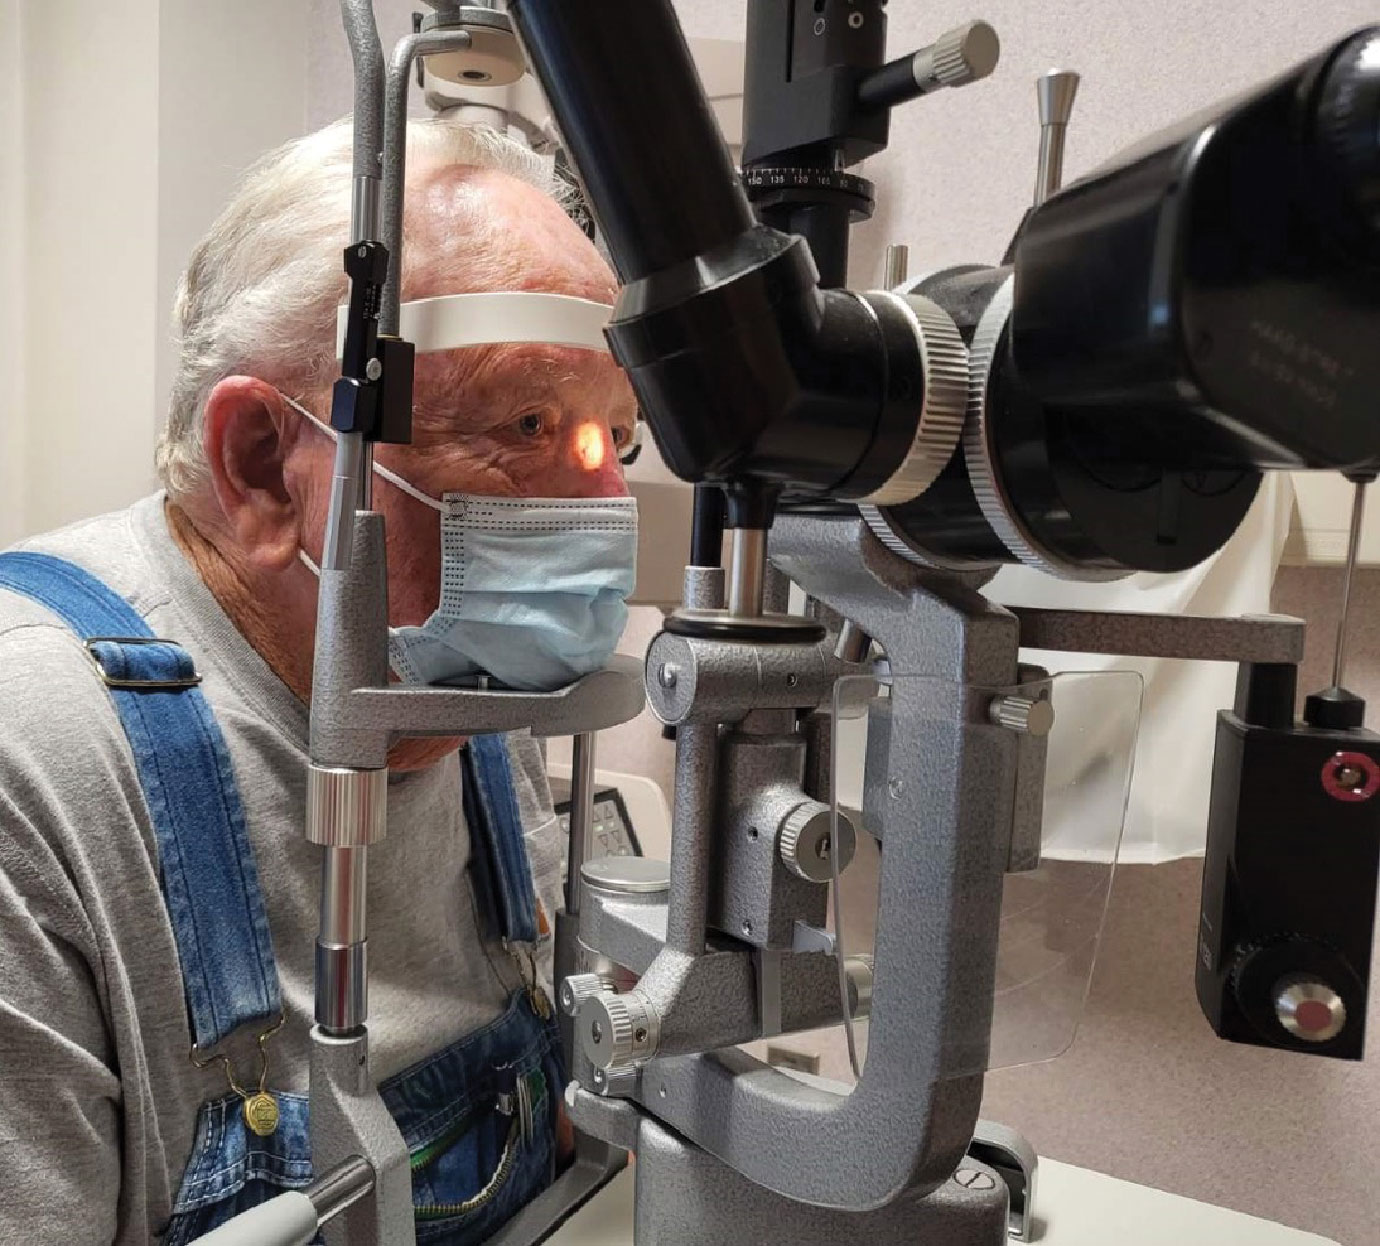
1. We all have patients who just can’t quite lean into or stay in the slit lamp for very long. You know what I’m talking about—big bellies. I see a lot of these in my practice and have learned that the most effective positioning tip is this: ask the patient to spread their legs apart and bend forward at their hips. This way, they don’t have to strain to bend forward over their belly; they can keep their back straight while hinging forward and you can put an end to labored breathing to stay in the slit lamp (Figure 1).
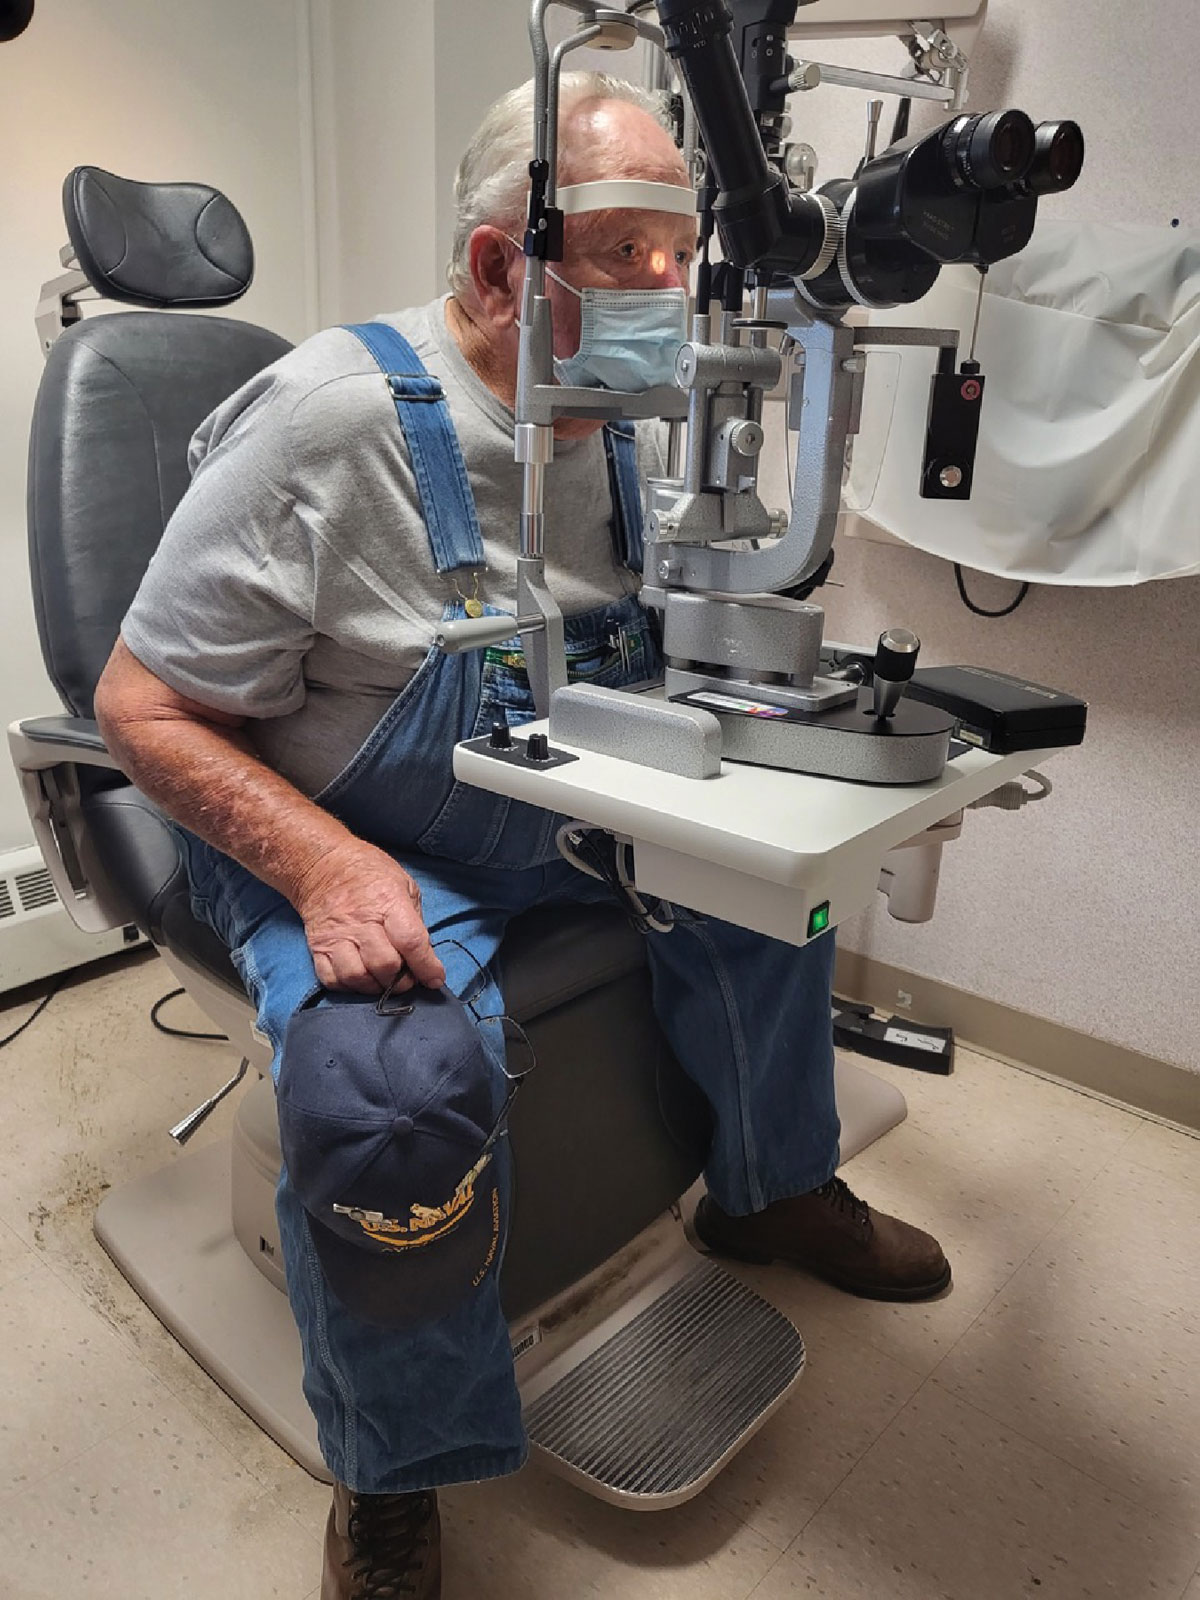 |
Fig. 1. Ask your patient to spread their legs apart and bend forward at their hips for a more comfortable fit into the slit lamp. Click image to enlarge. |
2. We share some responsibility with other healthcare providers for the whole patient. One simple and frequently encountered aspect of this is dermatologic lesions that are outside of the periorbital area. We should care about those, too.
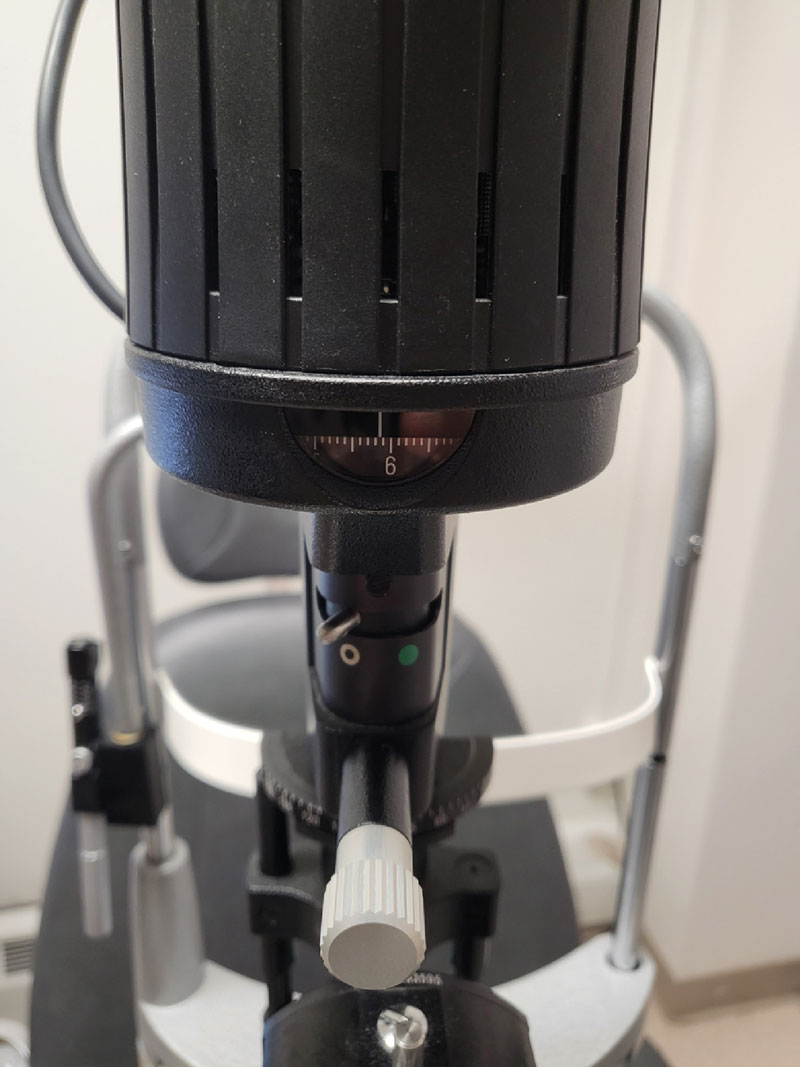
Before jumping into the exam, take a few moments to look at the patient as a whole. I can’t tell you how many cheeks, ears, noses, scalps and arms that have been biopsied or underwent micrographically oriented histographic surgery (MOHS) because I have referred suspicious lesions. It’s helpful to look at some of these under the slit lamp, but not all areas are easily viewed when the patient is in a typical position for an exam. The nasal sidewall in particular is difficult because it is more tangential to the direction of the light beam. For this, simply adjust the orientation of your entire ocular unit (Figure 2). My slit lamp can move 50° in either direction from center, and this allows me to look more directly at the sides of the nasal bridge and entire nasal sidewalls (Figure 3).
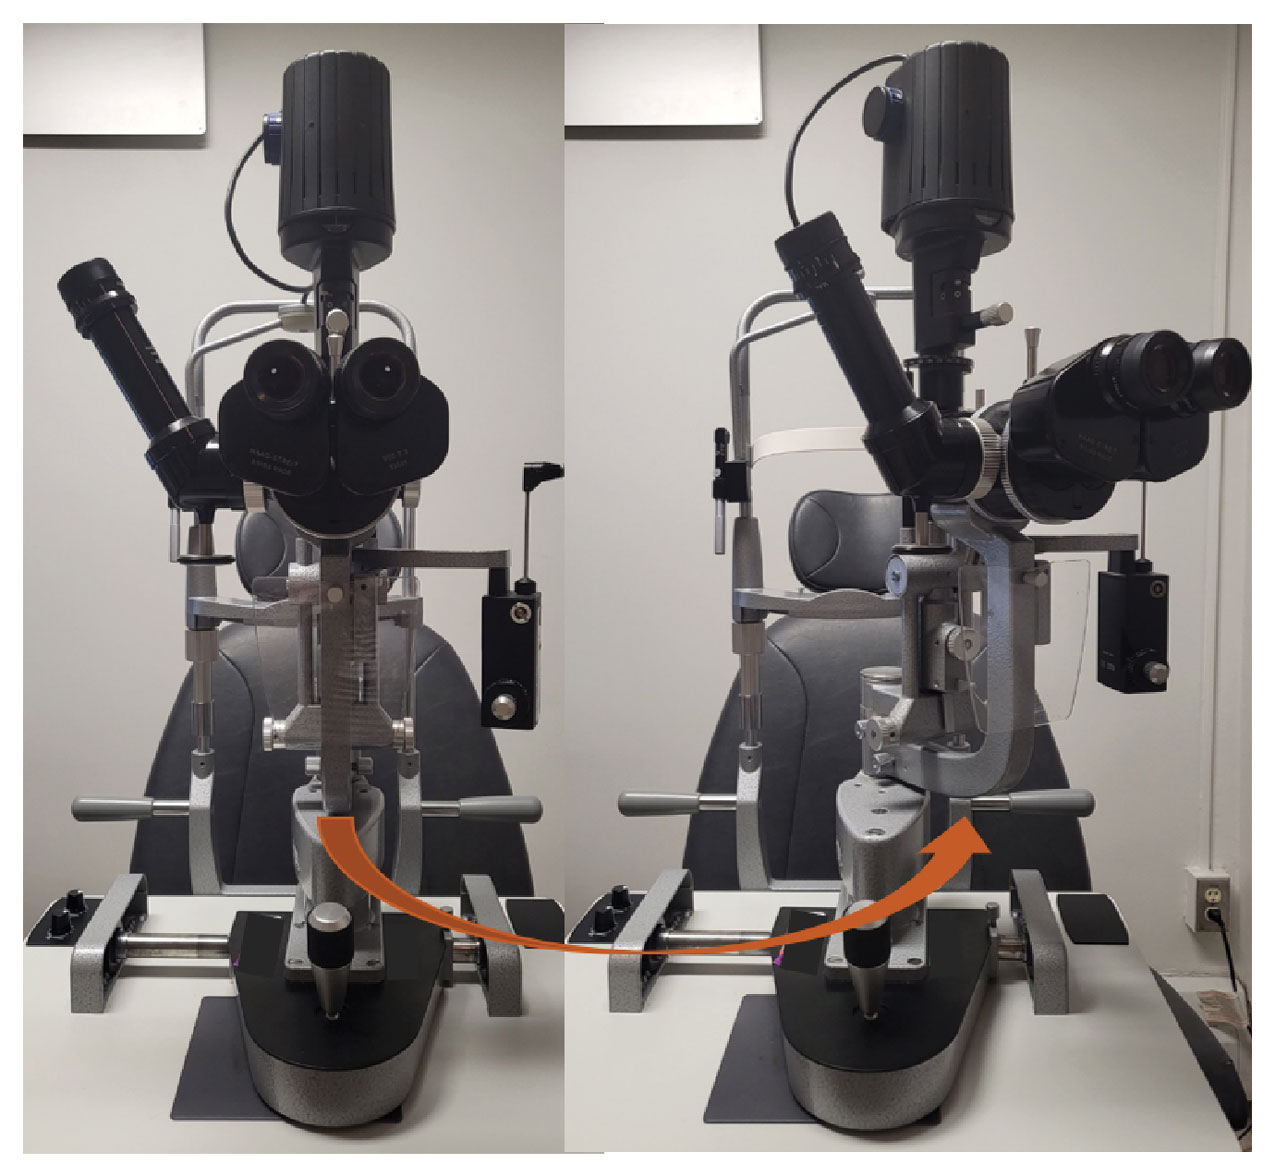 |
Fig. 2. The entire ocular-light source unit can be turned to adjust the orientation of the light source. Click image to enlarge. |
3. One major key to detecting change is to know exactly what it was like at baseline. Photographs (or other imaging modalities) are critical in many circumstances, but even without fancy technology, we can all do better with just our basic tools.
Use a ruler or your slit lamp calipers to take actual size measurements of everything that could change: eyelid lesions, conjunctival melanosis, iris nevi, choroidal nevi—the works. As we know, the slit lamp light beam height and width is adjustable, and when we adjust it we can conveniently read the beam size in millimeters and then change its orientation to get actual 360° measurements of anything we want (Figure 4).
Fundus Exam Tips
 |
|
Fig. 3. Turning the ocular-light unit allows you to better visualize areas at the slit lamp that are otherwise hard to see if it is tangential to the area of interest. Here, we can more easily evaluate a nasal sidewall lesion. Click image to enlarge. |
4. When taking measurements in the fundus using the slit beam caliper and a condensing lens, there are adjustment factors to calculate the actual measurement depending on which lens you’re using (i.e., 90D lens vs 78D lens). But guess what? I don’t have time for that. For example, it’s OK to write “1.2x3.4xflat (with 78D lens)” so you can quickly compare without having to whip out your calculator.
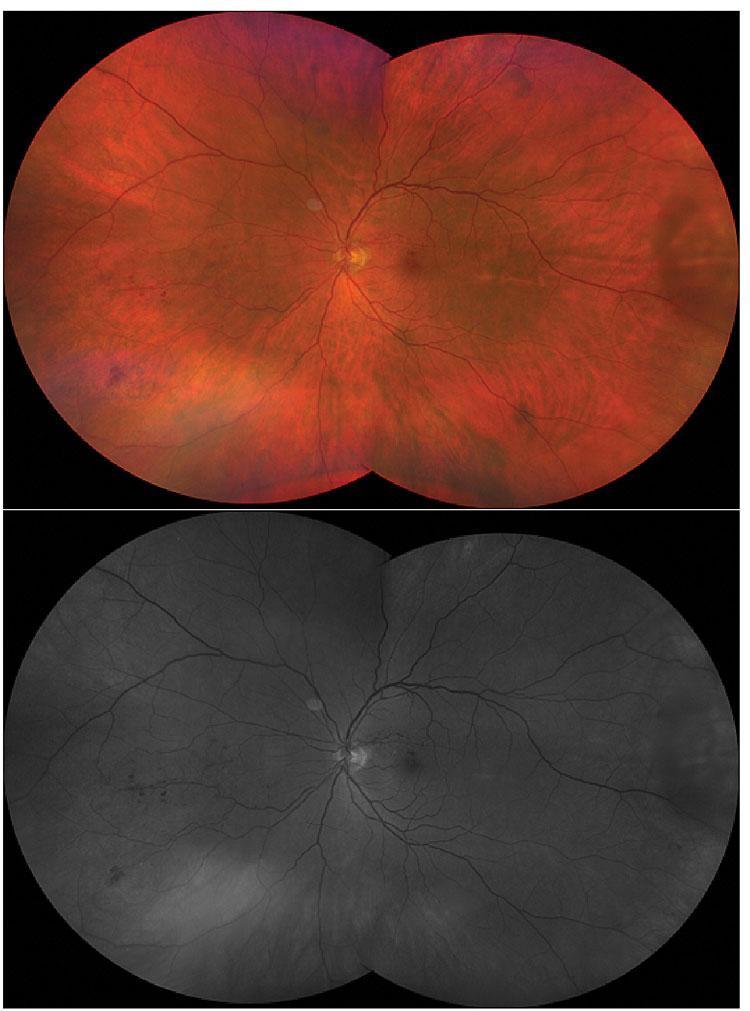
5. You know that red-free (AKA green) filter on your slit lamp? How often do you use it? While it’s sometimes helpful to make choroidal nevi disappear with it, the potential of the red-free filter is greater than just that magic trick. Recall that red light has longer wavelengths than green, so the red-free filter blocks longer wavelengths and transmits shorter ones. In layman’s terms, in the fundus it essentially suppresses visualization posterior to the RPE where the green light is reflected to make it look generally darker. It highlights superficial layers and makes red things, like blood and blood vessels, look black.1 This is tremendously helpful when picking up small microaneurysms and hemorrhages in the retina, since we can see these as black-on-dark background instead of the red-on-reddish background we see with white light on the fundus (Figure 5). This also can help you better appreciate the contour of the cup within the disc, as well as the areas of nerve fiber layer thinning, and makes epiretinal membranes shine.
 |
|
Fig. 4. Use the calipers on your slit lamp beam to measure. Click image to enlarge. |
 |
|
Fig. 5. White light (top) vs. red-free (bottom). Note the difference in contrast between the intraretinal hemorrhages and background color. Click image to enlarge. |
Peripheral Fundus Exam Tips
If you’re performing a peripheral retinal exam at the slit lamp, these minor adjustments can help you see more peripherally:
6. First, put your condensing lens as close as you can to the patient’s eye. The pupil, dilated or not, is like a keyhole; when you’re further away from the hole, your field of view on the other side is much narrower. Pushing it close will broaden your view and allow more room to visually navigate without your view being cut-off by the pupil.
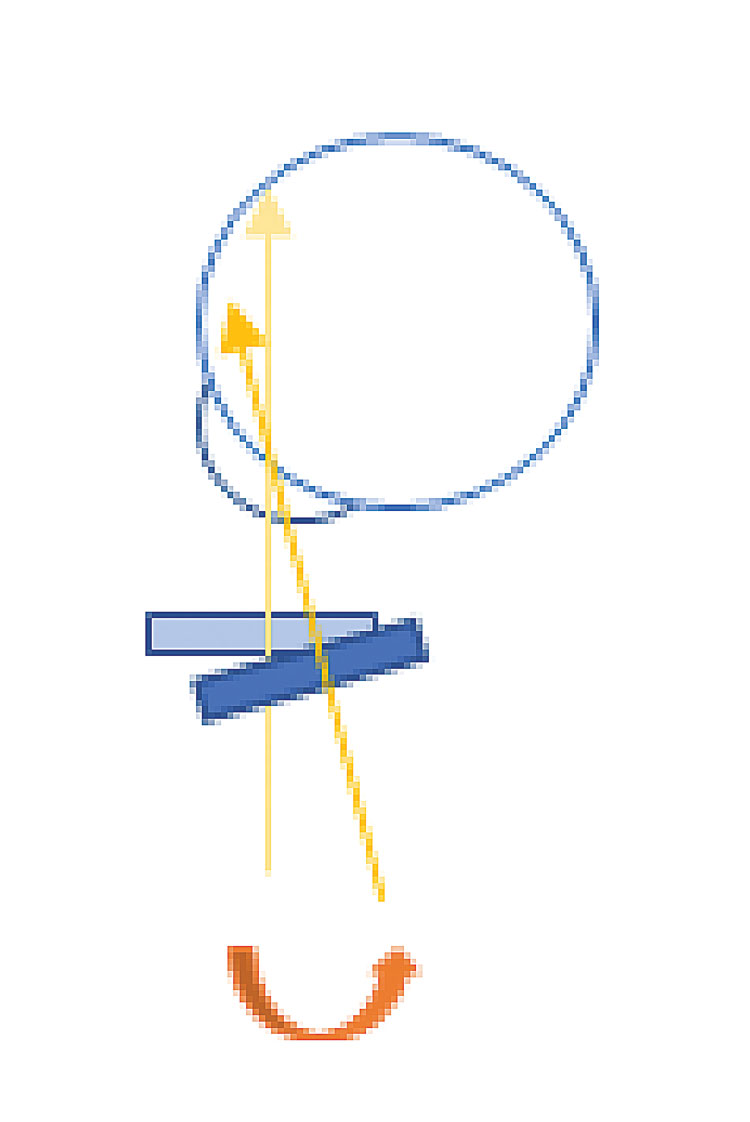 |
Fig. 6. A schematic of tilting the lens at the slit lamp. Tilting the condensing lens can direct the light more peripherally. Click image to enlarge. |
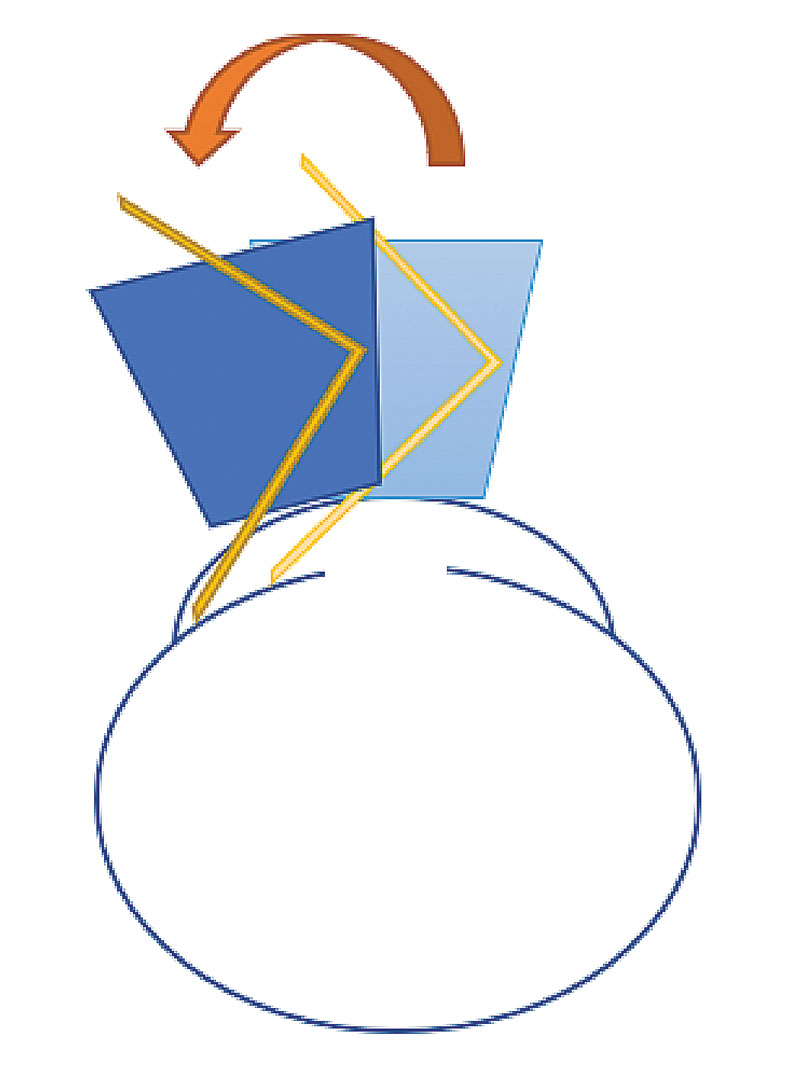
7. Next, tilting your condensing lens can make a huge difference. You don’t have to remember too much of optics to know that tilting the lens will redirect the light going out of it, so use that to your advantage. For example, if the patient is looking right/temporally with their right eye, move the lens slightly medially and tilt your thumb posteriorly (toward their medial canthus) to direct light more lateral/peripherally (Figure 6). Likewise, but opposite for the patient looking left, tilt the bottom of the lens toward the patient for upgaze and the top of the lens toward the patient for downgaze (Figure 7). This all remains true when using your 20D or 30D lens with your BIO, as well.
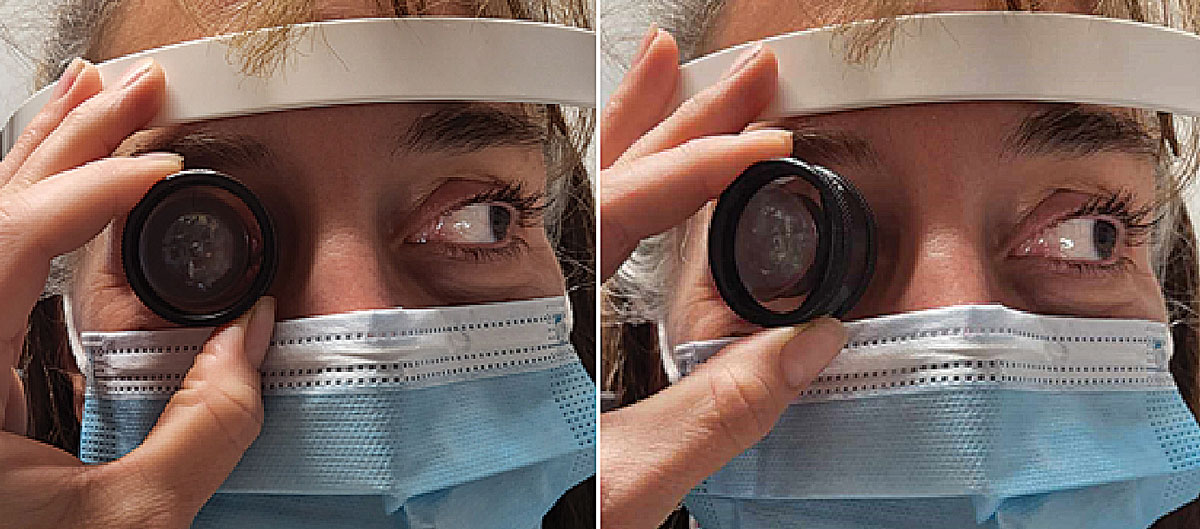 |
Fig. 7. Here is an example of tilting the condensing lens for peripheral view. Tilt toward the side of the face of the condensing lens that is opposite to the area you want to examine. For example, if the patient is looking left, tilt the left (your left) part of the lens laterally toward the face. Click image to enlarge. |
8. Then, if you adjust the orientation of your light source (i.e., for OD looking left, moving the entire light/ocular unit somewhat laterally/to your left so it projects the light medially), this can help you capture just a bit more peripheral retinal landscape.
9. Lastly, just plain do better. How many doctors have the patient look up, down, left and right for their peripheral exam? Boy, does that get my goat. Realizing that the eye is roughly a sphere, consider up/left, down/left, down/right, up/right. You’re missing prime real estate and doing a suboptimal exam if you don’t look at each sector of the retina, and this is amplified if you’re not scrolling around when you look at each sector. You will be a lot more likely to find problems if you actually look in those areas (Figure 8).
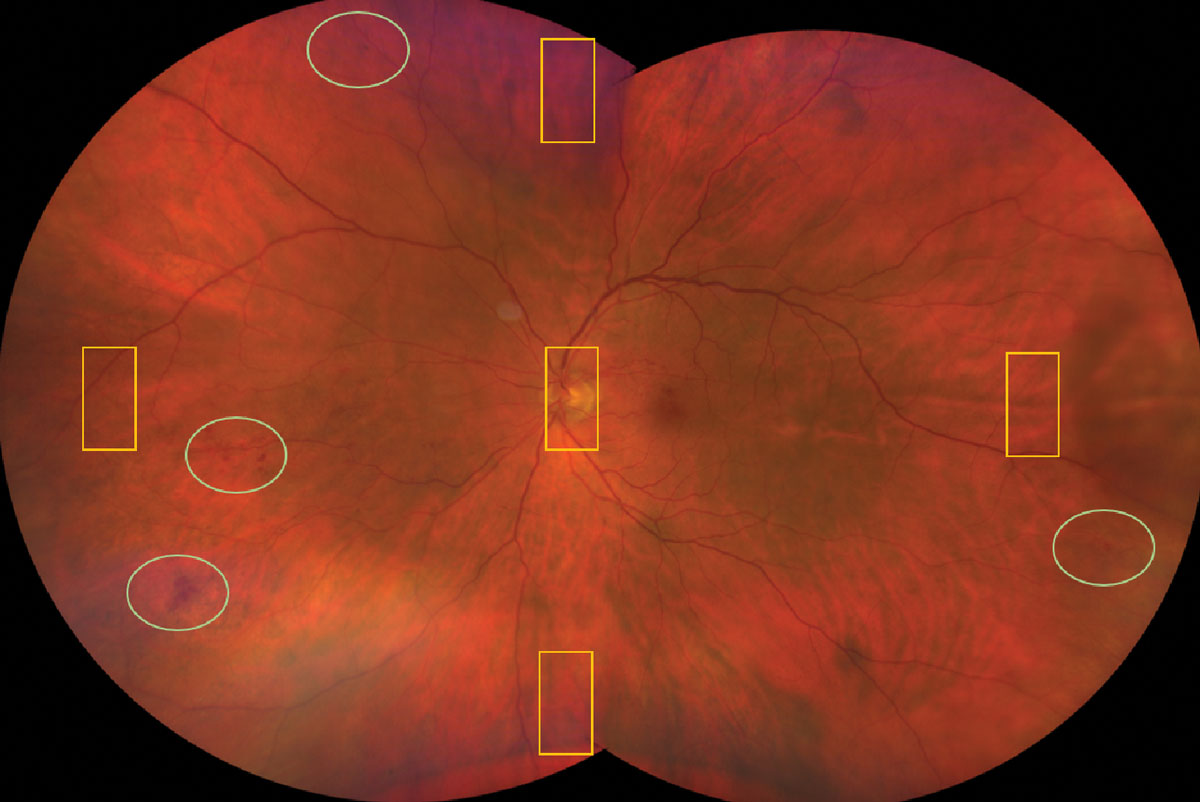 |
Fig. 8. The yellow rectangles are all you see if you have the patient look up, down, left and right for a peripheral exam. Notice what you’d be missing in the green ovals. Click image to enlarge. |
 |
Macula
12. Earlier we talked about moving the entire light/ocular unit for both the external ocular exam and for the peripheral retina. Guess what? We can do that for the macula, too. Subtle thickening in the macula is hard to pick up when you’re looking straight on from a top-down view. For example, it’s hard to tell how high a mountain is when you’re looking down from above. Shifting the light source to the side is akin to how we use a parallelepiped for the cornea—it allows you to appreciate thickness and topography more easily. This can be used elsewhere in the fundus, too (e.g., choroidal lesions).
Gonioscopy Tips
Our gonio lenses should be used regularly in our clinics. There are many conditions where we need to look at the iris and angle for glaucomas, ischemic eye diseases, iris tumors, trauma, etc., and this tool may be more versatile than you realize.
13. Tilt that lens. When a patient has steep or plateaued iris approaches, you really need to tilt your lens to see the angle structures. For example, if I’m looking at the temporal angle (anatomically), I use the medial mirror and can only see a bombéd iris; if I slide my lens slightly laterally on the cornea and tilt my lens laterally, I can see over the iris and down into the angle (Figure 9). This helps understand the actual angle anatomy.
14. Turn off all the lights. Doing this in your exam room, including items such as your computer monitor, promotes pupillary dilation that will more closely simulate the angle anatomy when it is at its “worst” (in regards to the narrowness of the angle) in scotopic conditions. Doing gonioscopy in brighter conditions can give you a false sense of safety or cause you to miss an occludable angle altogether.
15. Press that lens. When you’re dealing with a narrow angle and wondering if a laser peripheral iridotomy (LPI) would be helpful, perform dynamic/compression gonioscopy by applying pressure to the eye with the non-flanged gonio lens. If the trabecular meshwork is not blocked (i.e., if it is appositional, not synechial narrowing), aqueous will push into the angle, push the iris posteriorly and widen the angle with compression, suggesting that indeed, an LPI would be helpful.
Even if the trabecular meshwork was visible to start with, if the angle does not widen with compression, do not waste your time with an LPI. Don’t forget that you have to figure out and deal with why the angle is narrow or synechied (e.g., phacomorphism, neovascularization, choroidal effusion).
16. Use a 3-mirror gonioscope lens. While I reach for my 4- or 6 mirror most of the time, the image quality on a 3-mirror is higher. When looking for something more subtle, like neovascularization in the angle, pull out that 3-mirror and coupling solution to get a higher resolution view.
17. Remember, those three mirrors are at different angles for a reason. When you’re struggling to see something in the far peripheral retina, or even on the pars plana or the peripupillary posterior iris (like a posterior iris cyst), dilate the eye and use the 3-mirror lens for a beautiful view of those hard-to-see areas.
18. I’m not quite done with 3-mirror gonio lenses yet. They also have the central contact lens, and the view into the posterior pole with a contact lens is gorgeous. Trying using it, especially for subtle macular pathology.
19. One more thing. Your 3-mirror gonio lens can also be helpful for patients who are somewhat difficult to examine—they can try to squint all they want, but sometimes it’s even hard for me to break the coupling solution seal to pop the lens off, so the big 3-mirror can help keep lids open and out of the way, too. You could feasibly do your entire posterior segment exam with a 3-mirror gonio lens. Sounds like fun, right?
 |
|
Fig. 9. Tilting the gonio lens on the cornea can adjust your view down into the angle. Click image to enlarge. |
Pupil Evaluation
20. Pupils—size, shape, afferent and efferent responses—tell us so much, yet are often hurried through on exam. This is a topic that deserves significant discussion; for now, my best tip is to actually make sure you check them and do it very carefully. (Editor’s note: see the article on page 62 for comprehensive advice.)
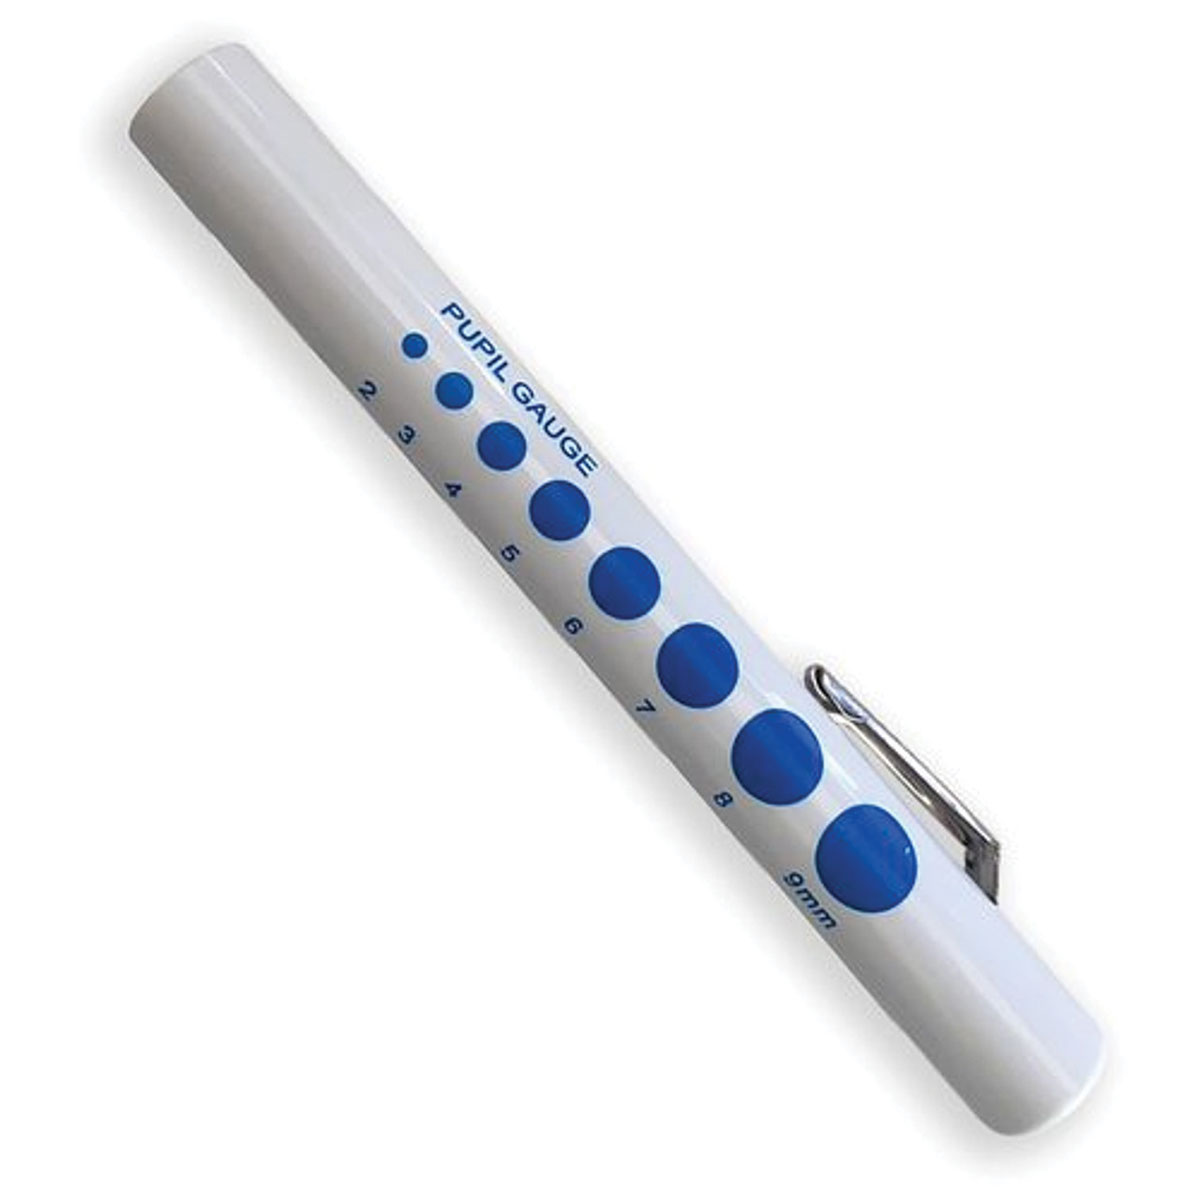
21. Earlier we talked about actually measuring things; pupils are one of those. Don’t forget that pupils should be evaluated in both bright and dim illumination. A super handy laminated paper with half-round pupil measurements on it gets quite a bit of love in my clinic, and other formats are available, too (Figure 10).
Ocular Alignment Evaluations
If you know me, you know I’m not a binocular vision guru. I’m sure pediatric ODs are going to bark at me for this, but these tips can help even the least binocular-vision-inclined OD.
22. Small heterophorias, vertical in particular, can sometimes be difficult to appreciate on cover tests. I find a Maddox rod to be really helpful. With the lines oriented vertically on the Maddox rod in front of one eye, have the patient look at a muscle light with both eyes and ask if the horizontal red line (produced by the rod) is above, below or straight through the light. If the line is lower than the light, the eye with the Maddox rod is hyper relative to the other eye. Then, you can use prism to measure the amount. With most patients, you’ll be able to speed through all positions of gaze with this very quickly and easily.
23. Another way to detect small heterophorias is to just ask your patient. As you perform the alternating cover test, ask them, “Does the target look higher with your right eye or your left eye uncovered?” The object will appear lower to the hyper eye because if the eye was hyper-deviated while covered, as soon as you uncover it the target will be hitting the retina superior to the fovea, which will make it look like it jumped down as soon as the eye is uncovered. The same principle works for eso- and exo- deviations. For example, in esophoria, the object will appear to the patient to be jumping the opposite direction as your paddle on alternating cover test, and in exophoria, the target will jump the same direction your paddle is moving.
24. This also works for a small tropia. When you perform the unilateral cover test, ask the patient if the object looks like it jumps at all when you cover their eye. If so, the eye you didn’t cover was not fixated on the target when both eyes were open—when you covered the fixating eye, the strabismic eye had to move to pick up fixation. Your patients will tell you exactly what you need to know, but only if you ask them.
 |
|
Fig. 10. A pupil gauge can help you quickly and more accurately measure pupil size. I keep a small laminated paper handy, but this one is printed directly on a penlight for convenience. Check and measure pupils very carefully in both bright and dim illumination..Click image to enlarge. |
 |
Takeaways
These tips and pearls don’t require any special equipment or skills, just the basic knowledge and tools we have in-office, to improve diagnostic elements of your exams. When I put this article together, I learned a bit myself about dry eye evaluations from one of my own optometric heroines, Nancy Peterson-Klein, OD (see box at right). Hopefully something discussed here will stick and help you do better across the board as well, while improving clinic life for you and your patients.
Dr. Weidmayer practices at the LTC Charles S. Kettles Medical Center, VA Ann Arbor Healthcare System in Ann Arbor, MI. She is also a clinical assistant professor for the Department of Ophthalmology and Visual Sciences, WK Kellogg Eye Center of the University of Michigan. She has no financial disclosures.
Dr. Peterson-Klein is Associate Dean Emeritus for Student and Academic Affairs and Professor Emeritus at the Michigan College of Optometry. She serves as a remote examiner for the National Board of Examiners in Optometry. She has no financial disclosures.
1. Leburg S. Rediscover Your Red Free. Rev Optom. Jan 2021;72-3. 2. Weidmayer SL, Demirci H. The spontaneous resolution of a vortex vein varix: case report. BMC Ophthalmol. 2021;21(1):101. 3. Pauk SV, Petriček I, Jukić T, Popović-Suić S, et al. Noninvasive tear film break-up time assessment using handheld lipid layer examination instrument. Acta Clin Croat. 2019;58(1):63-71. |